Yield: about 24–30 pieces
Pan: 8 × 8 inch / 20 × 20 cm
Prep: 20 minutes
Cooking: 10–15 minutes
Setting: 2–4 hours
Difficulty: Easy
Ingredients
Chocolate fudge base
400 g sweetened condensed milk
450 g semi-sweet or dark chocolate, finely chopped
60 g unsalted butter
1 tsp vanilla extract
¼ tsp fine sea salt
1 tbsp unsweetened cocoa powder, optional, for deeper chocolate flavor
Nut mixture
Use 180–220 g total nuts.
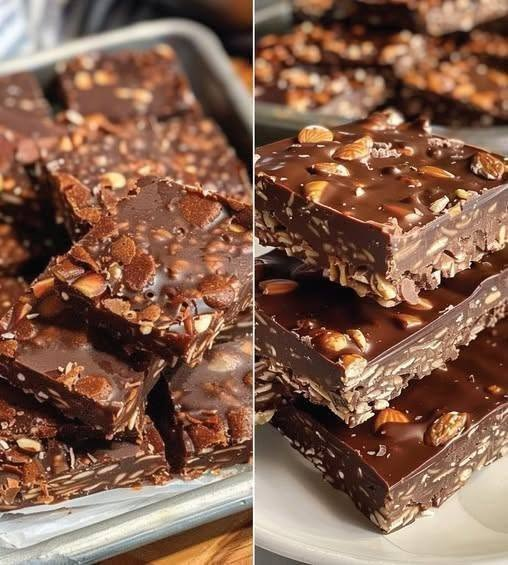
My recommended combination for the appearance in the picture:
60 g almonds
50 g hazelnuts
50 g pistachios
30 g walnuts
20–30 g pecans
You can use only one type if preferred. Toasting the nuts first gives substantially better flavor and crunch. Similar fudge recipes use toasted walnuts, almonds, hazelnuts, pecans, and pistachios.
For the glossy top
150 g semi-sweet or dark chocolate
50 ml heavy cream
15 g butter
40–50 g chopped toasted nuts
20–30 g whole pistachios/almonds/hazelnuts for decoration
Pinch of flaky sea salt, optional
1. Toast the nuts
Heat oven to 170°C / 340°F.
Spread the almonds, hazelnuts, pistachios, walnuts and pecans on a baking tray.
Toast for approximately 7–10 minutes, stirring once halfway through.
Watch carefully because pistachios and smaller nut pieces can brown faster.
Remove and cool completely.
Then:
Roughly chop about 180 g of the nuts.
Keep 40–50 g in attractive larger pieces for the top.
Keep a few whole pistachios/almonds/hazelnuts for decoration.
Toasting nuts before incorporating them is a common technique in condensed-milk chocolate fudge recipes and improves both flavor and texture.
2. Prepare the pan
Line an 8 × 8 inch / 20 × 20 cm pan with parchment paper.
Leave some paper hanging over two sides so you can lift the finished fudge out.
For particularly clean edges, lightly grease the pan before putting in the parchment.
3. Make the chocolate fudge
Put the following into a heavy saucepan:
400 g condensed milk
450 g chopped chocolate
60 g butter
¼ tsp salt
Heat over very low heat.
Stir continuously or very frequently.
The chocolate will gradually melt into the condensed milk.
Important
Do not boil aggressively.
You want a smooth, thick, glossy mixture—not a bubbling caramel.
Once completely melted, add:
1 tsp vanilla
1 tbsp cocoa powder, if using
Mix until completely smooth.
This basic condensed-milk/chocolate method is supported by several established fudge recipes; some versions use chocolate and condensed milk alone, while others add butter, vanilla and salt.
4. Add the nuts
Remove the saucepan from the heat.
Immediately add approximately:
180 g chopped toasted nuts
Stir thoroughly.
You want nuts distributed throughout rather than sitting only on the surface.
The mixture will become extremely thick.
5. First layer
Transfer roughly half of the fudge mixture to the lined pan.
Spread it firmly and evenly.
Use a lightly buttered or oiled spatula if it sticks.
For the photo-style layered appearance, don’t make this layer excessively thin.
Aim for approximately:
1–1.5 cm thickness.
Press gently to remove large air pockets.
6. Make the second chocolate layer
Add the remaining fudge mixture.
Spread it over the first layer.
Press gently with a spatula.
If you want very distinct layers like the photograph, chill the first layer for approximately 10–15 minutes before adding the second.
However, don’t chill it until completely hard; the second layer needs to adhere to it.
7. Make the glossy chocolate topping
Place:
150 g chocolate
50 ml heavy cream
15 g butter
in a heatproof bowl.
Melt gently over a double boiler, or microwave in short intervals, stirring after each interval.
Mix until completely smooth and shiny.
Do not overheat the chocolate.
8. Finish the fudge
Pour the glossy chocolate over the fudge.
Spread into an even layer.
Immediately scatter over:
40–50 g chopped toasted nuts
whole pistachios
almonds
hazelnuts
a few pecan pieces
For the exact visual style of your photograph, deliberately place some nuts near the edges so they remain visible from the side.
Finish with a tiny amount of flaky sea salt if you like the sweet-salty combination.
9. Set
Refrigerate for approximately 2–4 hours.
For the cleanest slices, I recommend:
2 hours refrigerated → 15–20 minutes at room temperature → cut.
Some condensed-milk fudge recipes set in around 1–2 hours, while thicker nut-heavy versions can benefit from several hours.
10. Cutting
Lift the entire block out using the parchment.
Use a large sharp knife.
For clean professional-looking pieces:
Dip knife in hot water.
Wipe completely dry.
Make one cut.
Wipe knife.
Repeat.
Cut into approximately 24 large squares or 30–36 smaller pieces.
Complete Nut Guide
Nut Flavor Texture Best use
Almond Mild, slightly sweet Firm/crunchy Inside + topping
Hazelnut Rich, roasted, chocolate-friendly Crunchy Excellent inside
Pistachio Sweet, buttery Firm Best decorative nut
Walnut Deep, slightly bitter Softer/crunchy Excellent inside
Pecan Buttery, caramel-like Crisp Excellent topping
Cashew Creamy, mild Dense/crunchy Good inside
Macadamia Very buttery Rich/crisp Luxury version
Peanut Strong roasted flavor Crunchy Budget-friendly version
Best combination for this particular dessert
I’d use:
Almond + hazelnut + pistachio + pecan
The pistachio gives the green color seen in the photograph, while hazelnut and almond provide the classic chocolate-and-nut flavor.
How Much Nuts Should You Use?
For 450 g chocolate + 400 g condensed milk:
Lightly nutty
100–120 g nuts
Balanced
150–180 g nuts
Very nutty — closest to your photo
200–220 g nuts
Extremely nut-heavy
250 g+
At very high amounts, the fudge becomes harder to spread and can become crumbly, so I’d stay around 200 g for the pictured texture.
Best Chocolate Ratio
For a rich but not excessively bitter result:
300 g semi-sweet chocolate + 150 g dark chocolate
For a darker, less-sweet version:
450 g 60–70% dark chocolate
For a sweeter milk-chocolate version:
300 g milk chocolate + 150 g semi-sweet chocolate
I recommend the first combination for this recipe. Q&A
Can I make this without condensed milk?
Yes, but you would need a different fudge formula. The condensed-milk version is much easier because it avoids the temperature precision required for traditional cooked fudge.
Can I use chocolate chips?
Yes. Good-quality chocolate chips work, although chopped couverture or baking chocolate generally melts more smoothly.
Can I use Nutella/hazelnut spread?
Yes. Replace about 75–100 g of the chocolate with 75–100 g hazelnut spread for a more pronounced hazelnut flavor. Keep some real chocolate in the formula so the fudge still sets firmly.
Can I use only walnuts?
Absolutely. Use approximately 180–200 g toasted walnuts.
Can I use only pistachios?
Yes. Use approximately 150–180 g pistachios inside, plus another 30–40 g on top.
Do the nuts have to be toasted?
Not absolutely—but I strongly recommend it. Toasting removes some raw flavor and intensifies the nutty aroma.
Can I skip the top ganache?
Yes. Simply press additional toasted nuts onto the soft fudge before it sets.
Why is my fudge too soft?
Possible causes:
Too much cream/liquid
Chocolate ratio too low
Not enough setting time
Chocolate was overheated
Very warm room temperature
Refrigerate it longer first. If it remains genuinely soft, the formula may need more chocolate.
Why did my fudge become hard?
Usually it was cooked too long or the chocolate-to-liquid ratio was too high.
The safest approach is gentle heat and stop as soon as everything is melted and homogeneous.
Why did my chocolate seize?
Water or steam may have entered the chocolate, or it may have been overheated.
When using a double boiler, keep the bowl and utensils completely dry.
Can I freeze it?
Yes. Wrap individual pieces tightly and place them in an airtight freezer container.
Thaw them in the refrigerator before serving.
How long does it last?
For best texture and flavor, keep it refrigerated in an airtight container and consume it within about 1–2 weeks. Some comparable fudge recipes give approximately two weeks at room temperature or longer refrigerated, depending on the formulation.
Does it need refrigeration?
For the best texture, yes. The glossy topping will also remain firmer when chilled.
Can I make it dairy-free?
Potentially, using dairy-free condensed milk, dairy-free chocolate, and plant-based butter/cream. Check every package because formulations vary.
Is this gluten-free?
The basic ingredients can be gluten-free, but check the chocolate, condensed milk, flavorings and any cross-contamination labeling if making it for someone with celiac disease.
Is this nut-free?
No. This recipe intentionally contains tree nuts.
Nut Allergy Information
This recipe contains tree nuts if you use almonds, hazelnuts, pistachios, walnuts or pecans.
Important distinction:
Almond: tree nut
Hazelnut: tree nut
Pistachio: tree nut
Walnut: tree nut
Pecan: tree nut
Cashew: tree nut
Macadamia: tree nut
Peanut: technically a legume, but a major allergen and often processed alongside tree nuts
If you’re serving someone with a nut allergy, don’t simply remove the nuts from this recipe. Chocolate and other ingredients can have cross-contact warnings, so use products specifically appropriate for that person’s allergy.
Pro Tips for the Photo-Style Result
For thick, sharp layers: use an 8 × 8-inch pan rather than a larger pan.
For visible nuts: reserve some larger pieces specifically for the sides and top.
For glossy chocolate: don’t overheat the topping.
For clean sides: chill thoroughly before removing the parchment.
For softer fudge: use a higher proportion of milk chocolate.
For firmer fudge: increase dark chocolate slightly.
For intense chocolate flavor: use 60–70% dark chocolate plus 1 tbsp cocoa powder.
For a luxury version: use toasted hazelnuts, pistachios, pecans and almonds, plus a small amount of flaky sea salt.

With years of experience in restaurant research and local SEO, Sara creates accurate, user-friendly guides that work for both people and search engines. Her goal is to help users go from search results to their nearest restaurant or menu choice with as few clicks as possible.
- Stuffed Cabbage Rolls - October 18, 2026
- Easy Crockpot Creamy Garlic Parmesan Chicken - October 18, 2026
- Turmeric Carrot Lentil Stew - October 18, 2026