Yield: 1 large loaf, about 10–12 slices
Prep: 20 minutes
First rise: 1–1½ hours
Second rise: 30–45 minutes
Bake: 35–45 minutes
Total: about 2½–3½ hours
The combination of garlic, rosemary, thyme and olive oil is commonly used in crusty herb breads.
Ingredients
For the bread
3½ cups (420 g) bread flour
1½ cups (360 g) warm water
2¼ teaspoons (7 g) active dry yeast
1 tablespoon (12–15 g) honey or sugar
1½ teaspoons (8–9 g) fine salt
2 tablespoons (30 ml) extra-virgin olive oil
4 cloves garlic, very finely minced
1 tablespoon fresh rosemary, finely chopped
1 tablespoon fresh thyme leaves
1 tablespoon fresh parsley, optional
½ teaspoon black pepper, optional
For the crust
1 tablespoon olive oil
1 teaspoon finely chopped rosemary
1 teaspoon thyme leaves
1 small garlic clove, grated or very finely minced
Pinch of flaky salt
Optional: 1 tablespoon sesame seeds or grated Parmesan
Full Step-by-Step Method
1. Activate the yeast
Put the warm water, honey/sugar and yeast into a large bowl.
The water should be warm rather than hot—roughly 105–115°F / 40–46°C.
Stir and leave for 5–10 minutes.
A light layer of foam should appear.
If nothing happens: your yeast may be old, or the water may have been too hot/cold.
2. Add the flour
Add:
bread flour
salt
olive oil
Mix with a wooden spoon or sturdy spatula.
The dough will initially look rough and sticky. That’s normal.
Don’t add a lot of extra flour at this stage. A slightly sticky dough helps produce the moist, open interior seen in artisan bread.
3. Add the garlic and herbs
Add:
minced garlic
rosemary
thyme
parsley, if using
black pepper
Mix until everything is evenly distributed.
Fresh rosemary and thyme give a stronger flavor than dried herbs. Similar garlic-herb bread recipes use these herbs directly in the dough.
4. Knead
Transfer the dough to a lightly floured counter.
Knead for approximately 7–10 minutes.
You’re looking for dough that is:
smooth
elastic
soft
slightly tacky
able to stretch without immediately tearing
Alternatively, use a stand mixer with a dough hook for approximately 5–7 minutes on low/medium-low speed.
5. First rise
Lightly oil a large bowl.
Place the dough inside and turn it once so the surface is lightly coated.
Cover with plastic wrap or a clean damp towel.
Let rise in a warm, draft-free place for approximately 1–1½ hours, or until roughly doubled.
The actual time depends heavily on room temperature.
Cool kitchen: may take 2 hours or longer.
Warm kitchen: may take only about 60–75 minutes.
6. Shape the loaf
Gently remove the dough from the bowl.
Don’t aggressively punch all the air out.
Shape it into a tight round or slightly oval loaf.
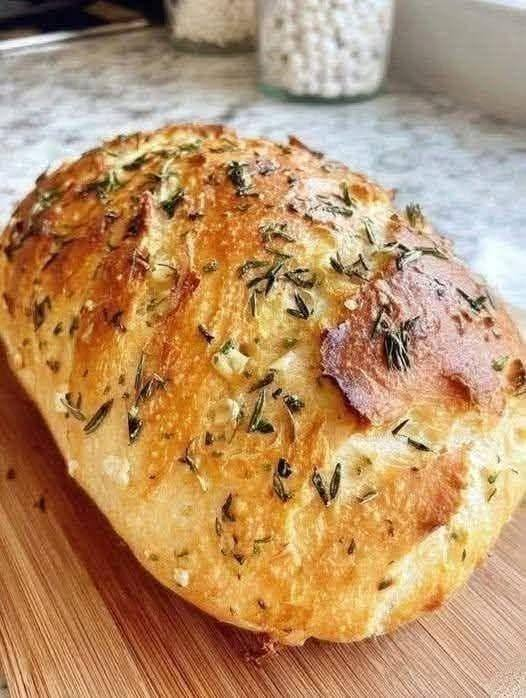
To get the appearance in your photograph, create a fairly tall, rustic oval rather than a very flat loaf.
Place it on parchment paper.
7. Second rise
Cover loosely and allow the shaped loaf to rise for approximately 30–45 minutes.
It doesn’t necessarily need to double.
A good test is to gently press the dough with one finger.
Springs back immediately → needs more proofing.
Slowly springs back → ready.
Collapses/stays deeply indented → probably over-proofed.
8. Score the bread
Ue a very sharp knife or bread lame.
Make:
one long slash down the center
or
2–3 diagonal slashes.
The cuts allow the loaf to expand during baking instead of splitting unpredictably.
9. Make the herb topping
Mix:
1 tablespoon olive oil
1 teaspoon rosemary
1 teaspoon thyme
1 small grated garlic clove
pinch of flaky salt
Brush this lightly over the surface.
Don’t completely saturate the dough.
Then sprinkle additional rosemary and thyme over the top.
This is what will give you the beautiful herb-covered appearance in the photograph.
10. Bake
Place a baking stone, Dutch oven, or heavy baking tray in the oven and preheat to:
450°F / 230°C
for at least 30 minutes.
Best method: Dutch oven
Carefully transfer the dough into the hot Dutch oven.
Cover with the lid.
Bake:
20 minutes at 450°F / 230°C
Then remove the lid.
Reduce to:
400°F / 205°C
and bake another 15–20 minutes.
The bread should become deeply golden brown.
A two-stage bake is useful for developing a crisp artisan crust; published garlic-herb bread recipes similarly use high initial heat followed by lower heat.
Optional buttery garlic finish
For an even richer loaf, mix:
1 tablespoon melted butter
1 tablespoon olive oil
½ minced garlic clove
½ teaspoon rosemary
½ teaspoon thyme
Brush a very thin layer over the hot loaf immediately after baking.
Don’t use too much or the crust can become soft instead of crisp.
11. Cool before cutting
This is important.
Place the loaf on a wire rack and allow it to cool for at least 45–60 minutes.
Don’t immediately cut into it.
The interior continues setting as it cools. Cutting too early can make the crumb appear gummy.
What the finished bread should be like
Outside
Deep golden brown
Crisp/crackly
Herb-covered
Slightly chewy
Inside
Soft
Moist
Lightly chewy
Irregular air pockets
Strong garlic/herb aroma
Flavor
The dominant flavor should be fresh bread + garlic + rosemary + thyme, rather than an overwhelmingly salty or garlicky taste.
🧄 Optional roasted-garlic version
For a sweeter, more sophisticated garlic flavor, use roasted garlic instead of raw garlic.
Take 1 whole garlic bulb, slice off the top, drizzle with olive oil, wrap in foil and roast at approximately 400°F / 205°C for 35–45 minutes, until soft and golden.
Cool it, squeeze out the cloves and mash them.
Use approximately 1 whole roasted garlic bulb in the dough.
Roasted garlic is particularly good in artisan bread because it gives a mellow sweetness rather than the sharper flavor of raw garlic. A 2026 artisan-bread recipe also uses roasted garlic folded into the loaf.
Cheesy Version
For the bread shown in your photo, I would actually keep the dough without cheese so the crust stays crisp.
But for a cheesy variation, add:
¾ cup shredded mozzarella
¼ cup Parmesan
extra rosemary and thyme
You can also turn the finished loaf into pull-apart garlic bread by cutting it into a diamond pattern, adding garlic butter and cheese, then baking until melted.
Flour substitutions
Bread flour — BEST
Use 420 g bread flour for the chewiest crust and best structure.
All-purpose flour
Use 420 g all-purpose flour.
The loaf will generally be slightly less chewy but still excellent.
Whole-wheat
Replace only 100–125 g of the bread flour with whole-wheat flour.
Don’t replace all the flour unless you’re specifically making whole-wheat bread.
Gluten-free
This recipe isn’t directly interchangeable with gluten-free flour because yeast bread depends on gluten structure.
Fresh vs dried herbs
If using fresh:
1 tbsp rosemary
1 tbsp thyme
If using dried, use approximately:
1 teaspoon dried rosemary
1 teaspoon dried thyme
Dried herbs are more concentrated, so don’t substitute them 1:1 by volume.
Approximate Nutrition
For 1 of 12 slices, assuming the basic recipe and no cheese/butter topping:
Nutrition Approx. per slice
Calories 165–180 kcal
Carbohydrates 31–33 g
Protein 5–6 g
Fat 3–4 g
Saturated fat <1 g
Fiber 1–2 g
Sugar 1–2 g
Sodium 290–350 mg
These are estimates, because the actual nutrition depends on the flour, salt, oil and slice size. For comparison, a published garlic-herb bread recipe reports about 162 calories, 29 g carbohydrate and 4 g protein per serving.
Allergy & “nut” information
If by “nut info” you mean nutritional/allergen information:
Contains
Wheat/gluten
Usually does NOT contain
Peanuts
Tree nuts
Eggs
Milk/dairy, if you use olive oil rather than butter
Soy
Possible allergens
Check the labels of your flour, yeast, Parmesan, toppings and any packaged ingredients for cross-contact warnings.
If adding Parmesan or butter, the recipe becomes dairy-containing.
If adding sesame seeds, it also contains sesame, which is a major food allergen in many countries.
Recipe Q&A
Can I make this without a Dutch oven?
Yes. Put a metal baking tray on the bottom rack while preheating. Place the bread on a separate tray and add a little boiling water to the hot tray when the bread goes in.
The steam helps produce a crisp crust.
Why is my bread dense?
Usually one of these:
Yeast wasn’t active.
Dough didn’t rise enough.
Too much flour was added.
Dough was over-kneaded or under-developed.
Second proof was too short.
Yeast was old.
Why did my bread spread instead of becoming tall?
The dough may have been too wet, under-shaped, or over-proofed.
During shaping, create good surface tension by gently pulling the outer dough underneath the loaf.
Why isn’t the crust crispy?
Common causes are:
insufficient oven temperature
insufficient steam
cutting the bread while hot
storing it while still warm
too much butter/oil on the crust
Can I use garlic powder?
Yes, but fresh garlic tastes much better.
Use approximately 1–1½ teaspoons garlic powder if you don’t have fresh garlic.
Can I use only rosemary?
Absolutely. Use about 1½–2 tablespoons fresh rosemary.
Can I use Italian seasoning?
Yes. Start with 1–1½ teaspoons, but fresh rosemary and thyme will give a flavor closer to the photograph.
Can I make it overnight?
Yes. After shaping, cover the dough and refrigerate it for 8–16 hours.
The next day, let it sit at room temperature for approximately 30–60 minutes while the oven heats, then bake.
Can I freeze it?
Yes.
For best results, cool completely, wrap tightly and freeze for up to about 2–3 months.
You can also slice it before freezing so individual pieces can be reheated.
How do I reheat it?
For a whole/large piece:
350°F / 175°C for 10–15 minutes.
For individual slices:
350°F / 175°C for 5–8 minutes.
How do I keep the crust crispy?
Store the cooled loaf loosely in a paper bag or bread bag at room temperature.
Avoid sealing a warm loaf in plastic—the trapped moisture softens the crust.
Can I make it vegan?
Yes. The base recipe is already vegan if you use olive oil and honey is replaced with sugar or maple syrup.
Use sugar instead of honey for a fully vegan version.
Can I make it without sugar?
Yes. The sugar/honey is helpful for yeast activity and browning but isn’t essential.
Simply omit it.
Is the bread safe to eat when it’s still slightly soft inside?
Bread doesn’t have the same universal safety-temperature requirement as meat; texture and doneness are better judged by the structure of the loaf. For foods where temperature safety matters, USDA emphasizes using a thermometer rather than relying solely on appearance.
My recommended version for matching your photo
Use:
420 g bread flour + 360 g water + 7 g yeast + 15 g honey + 8 g salt + 30 g olive oil + 4 garlic cloves + 1 tbsp rosemary + 1 tbsp thyme.
Then brush the shaped loaf with olive oil + rosemary + thyme + a little garlic, sprinkle herbs over the top, and bake in a covered Dutch oven at 450°F for 20 minutes, followed by 15–20 minutes uncovered at 400°F

With years of experience in restaurant research and local SEO, Sara creates accurate, user-friendly guides that work for both people and search engines. Her goal is to help users go from search results to their nearest restaurant or menu choice with as few clicks as possible.
- Grandma’s Cream Puffs – Light, Crisp & Creamy - October 17, 2026
- Easy Crockpot Creamy Garlic Parmesan Chicken - October 17, 2026
- Garlic Herb Roasted Potatoes - October 17, 2026