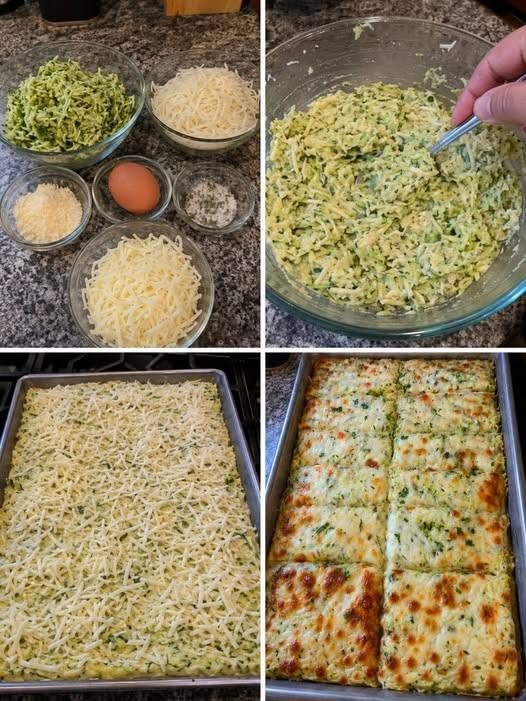
These cheesy zucchini breadsticks are soft and savory inside, golden and crisp around the edges, and loaded with mozzarella and Parmesan. They are a delicious low-carb alternative to traditional breadsticks and work beautifully as an appetizer, snack, or side dish.
Ingredients
For the Zucchini Base
4 medium zucchini, about 6 cups grated
2 large eggs
1½ cups shredded mozzarella cheese
½ cup grated Parmesan cheese
2 cloves garlic, minced
1 teaspoon Italian seasoning
½ teaspoon garlic powder
½ teaspoon dried oregano
¼ teaspoon black pepper
¼ teaspoon salt
For the Cheesy Topping
1 cup shredded mozzarella cheese
¼ cup grated Parmesan cheese
½ teaspoon Italian seasoning
1 tablespoon fresh parsley, chopped
Optional
¼ teaspoon red pepper flakes
1 tablespoon chopped fresh basil
½ teaspoon onion powder
Equipment
Large baking sheet
Parchment paper
Box grater or food processor
Large mixing bowl
Clean kitchen towel or cheesecloth
Spatula
Sharp knife
Cutting board
Instructions
1. Preheat the Oven
Preheat your oven to:
425°F (220°C)
Line a large baking sheet with parchment paper.
Lightly brush the parchment with olive oil.
2. Grate the Zucchini
Wash and dry the zucchini.
Grate it using the large holes of a box grater.
Place the grated zucchini in a colander.
Sprinkle with approximately ½ teaspoon salt and gently mix.
Let it sit for 10–15 minutes.
3. Remove Excess Water
This is the most important step for crispy zucchini breadsticks.
Transfer the zucchini to a clean kitchen towel or cheesecloth.
Squeeze very firmly to remove as much liquid as possible.
You should end up with approximately 2½–3 cups of well-drained zucchini.
Why this matters
Zucchini contains a large amount of water. If too much moisture remains, the breadsticks can become soft and difficult to cut.
4. Make the Zucchini Mixture
Place the squeezed zucchini into a large bowl.
Add:
2 eggs
1½ cups mozzarella
½ cup Parmesan
Minced garlic
Italian seasoning
Garlic powder
Oregano
Black pepper
Optional red pepper flakes
Mix thoroughly until everything is evenly combined.
5. Shape the Breadstick Base
Transfer the mixture to the prepared baking sheet.
Press it into a rectangle approximately:
½ inch thick
Try to keep the thickness even from edge to edge.
For approximately 12 breadsticks, shape the rectangle around 8×12 inches.
6. First Bake
Bake at:
425°F (220°C) for 18–22 minutes
The zucchini base should become:
Firm
Golden around the edges
Dry enough to lift from the parchment
Lightly browned on the surface
7. Flip the Base
Carefully place another sheet of parchment paper over the zucchini crust.
Using another baking sheet or large cutting board, carefully flip the crust.
Remove the original parchment.
If the crust is still very soft, return it to the oven for another 5 minutes before proceeding.
Alternative
If flipping feels difficult, simply leave it in place and continue baking until firm. The bottom may not become quite as crisp, but the breadsticks will still be delicious.
8. Add the Cheese Topping
Sprinkle the top evenly with:
1 cup mozzarella
¼ cup Parmesan
½ teaspoon Italian seasoning
Return the baking sheet to the oven.
Bake for another:
5–8 minutes
until the cheese has completely melted.
9. Broil for Extra Browning
For a beautiful golden cheesy top, switch the oven to broil.
Broil for approximately:
1–2 minutes
Watch constantly because the cheese can burn very quickly.
10. Cut Into Breadsticks
Remove from the oven and allow the breadstick slab to cool for approximately 5 minutes.
Using a sharp knife or pizza cutter, cut into approximately 12 breadsticks.
For smaller appetizer portions, cut into 16 pieces.
11. Garnish and Serve
Sprinkle with fresh parsley and optional fresh basil.
Serve warm with:
Marinara sauce
Garlic butter
Ranch dressing
Tzatziki
Tomato dipping sauce
Nutrition Information
Approximate per breadstick, based on 12 servings:
Calories: ~105–120 kcal
Protein: ~7–8 g
Total Fat: ~7–8 g
Saturated Fat: ~4 g
Carbohydrates: ~3–4 g
Fiber: ~1 g
Net Carbs: ~2–3 g
Sugar: ~1–2 g
Sodium: ~250–320 mg
Calcium: ~150–180 mg
Nutrition will vary depending on the size of the zucchini and the type and amount of cheese used.
All Nut Information
Does this recipe contain nuts?
No.
The standard recipe contains no tree nuts and no peanuts.
Tree nuts
Almonds: No
Walnuts: No
Pecans: No
Pistachios: No
Cashews: No
Hazelnuts: No
Macadamia nuts: No
Peanuts
No
Coconut
No
Sesame
No
Nut-free status
The recipe is nut-free as written.
If preparing for someone with a severe nut allergy, check packaged mozzarella, Parmesan, seasonings, and other ingredients for allergen warnings and cross-contact.
Dietary Information
Vegetarian: Yes
Nut-free: Yes
Gluten-free: Yes
Low-carb: Yes
Keto-friendly: Yes
High-protein: Moderate
Refined-flour-free: Yes
Dairy-free: No
Egg-free: No
Vegan: No
Tips for Perfect Zucchini Breadsticks
1. Squeeze the zucchini extremely well
This is the secret to a firm breadstick.
If the zucchini remains watery, the finished breadsticks can become soggy.
2. Don’t make the base too thick
Keep it around ½ inch thick so it cooks evenly.
3. Use low-moisture mozzarella
Low-moisture shredded mozzarella generally produces a firmer, less watery topping.
4. Let it cool before cutting
The zucchini base becomes firmer as it cools slightly.
5. Don’t skip the second bake
The first bake sets the zucchini base; the second bake melts and browns the cheese.
Air Fryer Method
You can make smaller individual breadsticks in an air fryer.
Instructions
Prepare the zucchini mixture as directed.
Shape small rectangles on parchment.
Air fry at 375°F (190°C) for approximately 10–14 minutes.
Add mozzarella and Parmesan.
Air fry for another 2–4 minutes, until golden and bubbly.
Work in batches and avoid overcrowding.
Extra Crispy Version
For crispier breadsticks:
Squeeze the zucchini twice.
Add 2 tablespoons Parmesan to the zucchini mixture.
Spread the base slightly thinner.
Bake an additional 3–5 minutes before adding the topping.
Broil briefly after adding the cheese.
Garlic Butter Version
After baking, brush the breadsticks with:
1 tablespoon melted butter
1 minced garlic clove
½ teaspoon dried parsley
Pinch of Parmesan
This gives them a classic garlic-bread flavor.
Spicy Version
Add to the zucchini mixture:
½ teaspoon red pepper flakes
¼ teaspoon cayenne
½ teaspoon smoked paprika
Finish with a drizzle of hot honey if desired.
Mediterranean Version
Add:
1 tablespoon chopped fresh parsley
1 tablespoon chopped fresh basil
½ teaspoon oregano
1 teaspoon lemon zest
Serve with tzatziki or whipped feta.
High-Protein Version
For additional protein:
Add ¼ cup extra Parmesan.
Use part-skim mozzarella.
Serve with a Greek-yogurt-based dipping sauce.
You can also serve the breadsticks alongside grilled chicken or turkey.
Storage
Store cooled breadsticks in an airtight container in the refrigerator for 3–4 days.
Place parchment between layers if stacking them.
Reheating
Oven
Heat at 375°F (190°C) for approximately 6–10 minutes.
Air fryer
Heat at 350°F (175°C) for approximately 3–5 minutes.
Microwave
Heat for 30–60 seconds, but the breadsticks will be softer.
For the best texture, use the oven or air fryer.
Freezing Instructions
Allow the breadsticks to cool completely.
Cut them into individual pieces.
Place them on a baking sheet and freeze until solid.
Transfer to a freezer-safe container or bag.
Freeze for up to 2 months.
Reheat directly from frozen at 375°F (190°C) for approximately 10–15 minutes.
Frequently Asked Questions
Q: Why are my zucchini breadsticks soggy?
The zucchini probably contained too much water. Squeeze the grated zucchini very thoroughly before mixing it with the other ingredients.
Q: Can I use frozen zucchini?
Yes, but thaw it completely and squeeze out as much water as possible. Fresh zucchini usually gives a better texture.
Q: Can I make these without eggs?
Eggs help bind the zucchini and cheese. You can experiment with an egg substitute, but the texture may be softer.
Q: Can I use cheddar instead of mozzarella?
Yes. Cheddar gives a stronger flavor and beautiful color. A mixture of cheddar and mozzarella works particularly well.
Q: Can I use Parmesan only?
You can, but mozzarella provides better stretch and moisture. A combination gives the best texture.
Q: Can I add almond flour?
Yes, adding 2–3 tablespoons almond flour can help absorb moisture, but the recipe will no longer be nut-free.
Q: Can I make it completely nut-free?
Yes. Follow the recipe exactly as written and don’t add almond flour or other nuts.
Q: Can I make these gluten-free?
Yes. The recipe is naturally flourless and gluten-free as written. Check packaged ingredients for cross-contact if necessary.
Q: Can I make them keto?
Yes. The recipe is naturally low in carbohydrates and contains no traditional flour or breadcrumbs.
Q: Can I add chicken?
Yes. Finely chopped cooked chicken can be added, although too much can make the mixture difficult to bind.
Q: Can I add spinach?
Yes. Finely chopped cooked spinach works well, but squeeze it extremely dry first.
Q: What dipping sauce is best?
Marinara is a classic choice. Garlic butter, ranch, tzatziki, or a spicy Greek-yogurt dip are also excellent.
Q: Can I prepare these ahead?
Yes. Bake the zucchini base ahead of time, refrigerate it, then add the cheese topping and finish baking just before serving.
Q: Can I serve them as a main meal?
They work best as a side or appetizer, but you can make them part of a meal by serving them with grilled chicken, fish, turkey, salad, or soup.
Serving Suggestion
Arrange the warm breadsticks on a platter and sprinkle with fresh parsley and Parmesan. Serve alongside a bowl of warm marinara sauce for dipping. For a Mediterranean-style meal, pair them with Greek salad, grilled chicken, and tzatziki.
Servings: 12 breadsticks
Prep Time: 20 minutes
First Bake: 18–22 minutes
Cheese Bake: 5–8 minutes
Total Time: Approximately 50 minutes.

With years of experience in restaurant research and local SEO, Sara creates accurate, user-friendly guides that work for both people and search engines. Her goal is to help users go from search results to their nearest restaurant or menu choice with as few clicks as possible.
- Stuffed Cabbage Rolls - October 18, 2026
- Easy Crockpot Creamy Garlic Parmesan Chicken - October 18, 2026
- Turmeric Carrot Lentil Stew - October 18, 2026