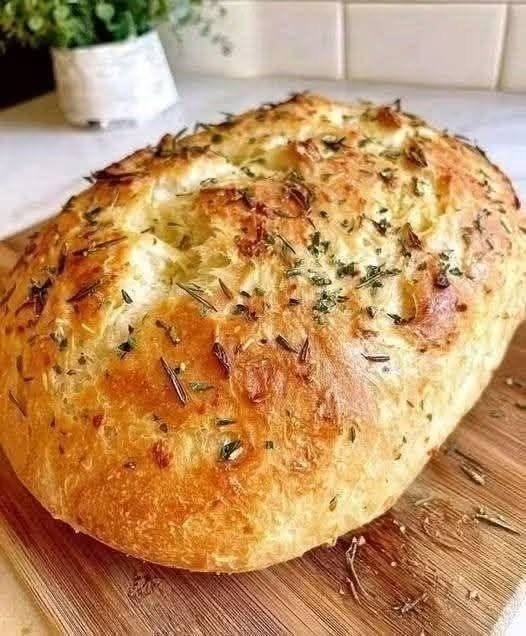
The bread in your photo looks like a rustic garlic-and-herb artisan loaf: golden, crisp on the outside, soft and airy inside, with garlic, rosemary/thyme and herbs baked into the crust. A Dutch oven is ideal because it traps steam and helps create that thick, crackly crust.
K
Kitchn
+1
Recipe at a glance
Yield: 1 large round loaf
Servings: 8–12 slices
Prep: 15–20 minutes
First rise: 12–18 hours for best flavor
Second rest: 30–45 minutes
Bake: about 45 minutes
Oven: 230°C / 450°F
Difficulty: Easy
Method: No-knead
Texture: Crispy crust + soft, chewy center
Ingredients
For the bread
Ingredient Amount
All-purpose/plain flour 375 g / about 3 cups
Lukewarm water 350–360 ml / 1½ cups
Instant yeast 1 tsp
Salt 1½ tsp / about 8 g
Olive oil 1 tbsp
Honey or sugar 1 tsp
Garlic 4–6 cloves
Fresh rosemary 1 tbsp, finely chopped
Fresh thyme 1 tbsp, finely chopped
Fresh parsley 1 tbsp, chopped
Black pepper ½ tsp, optional
Dried Italian herbs 1 tsp, optional
For the top
1 tbsp olive oil
1–2 garlic cloves, very finely minced
1 tsp chopped rosemary
½ tsp thyme
A pinch of flaky/sea salt
Optional: 1–2 tbsp grated Parmesan
Optional: sesame seeds, nigella seeds or sunflower seeds
Important: Don’t overload the top with fresh garlic. Garlic can burn during the uncovered baking stage. For a sweeter, deeper garlic flavor, roasted garlic works especially well. Roasted garlic is also a common variation in garlic-herb no-knead bread.
K
Kitchn
Step-by-step method
1. Prepare the garlic
You have two options.
Quick version
Finely mince 4–6 garlic cloves.
Better-flavor version — roasted garlic
Cut the top from 1 whole garlic bulb, drizzle with a little olive oil, wrap in foil and roast at about 180°C / 350°F for 30–40 minutes, until soft.
Cool, then squeeze the cloves from their skins.
Roasting makes the garlic sweeter and less sharp.
K
Kitchn
2. Mix the dry ingredients
In a large bowl combine:
375 g flour
1½ tsp salt
1 tsp instant yeast
1 tsp honey/sugar
black pepper
Mix well.
3. Add water
Pour in:
350–360 ml lukewarm water
1 tbsp olive oil
Add the garlic and herbs.
Mix with a wooden spoon or spatula until no dry flour remains.
The dough should look:
sticky
wet
shaggy
loose
Do not add lots of extra flour.
High-hydration dough is what helps produce the rustic, open crumb.
4. First rise — the important part
Cover the bowl tightly with plastic wrap, a lid or a damp towel.
Leave at room temperature for:
Best:
12–18 hours
The dough should become:
approximately doubled
bubbly
stretchy
full of air
Overnight fermentation is particularly convenient for this style of bread, and similar no-knead recipes use a 12–18-hour rise.
I
I Heart Eating
If you’re in a hurry
Let it rise somewhere warm for approximately 2–3 hours, or until visibly doubled.
The long fermentation generally gives better flavor and texture.
5. Shape the loaf
Generously flour your work surface or place a large sheet of parchment paper down.
Scrape the dough onto it.
Don’t knead it.
Instead:
Pull one side toward the center.
Pull the opposite side toward the center.
Fold the other two sides inward.
Turn the dough over.
Gently form it into a round ball.
You can repeat the folding 3–4 times if the dough feels extremely loose.
6. Second rest
Place the dough on parchment.
Cover loosely.
Rest for 30–45 minutes.
Meanwhile, preheat your oven.
7. Preheat the Dutch oven
Put your Dutch oven/cast-iron pot with its lid on into the oven.
Heat to:
230°C / 450°F
Allow the pot to heat for approximately 30 minutes.
The extremely hot covered pot creates steam around the dough, which is a major reason Dutch-oven bread develops such a crisp crust.
I
I Heart Eating
+1
8. Prepare the top
Just before baking, brush the dough lightly with:
1 tbsp olive oil
Then sprinkle:
rosemary
thyme
a little minced garlic
flaky salt
For the look in your photograph
Add a small amount of:
rosemary needles
thyme
dried herbs
thin garlic pieces
Don’t completely cover the dough—the exposed golden crust looks more rustic.
You can also make one shallow slash across the top with a sharp knife.
9. Bake
Carefully remove the extremely hot Dutch oven.
Be very careful—the pot and lid will be dangerously hot.
Use the parchment paper to lower the dough into the pot.
Put the lid on immediately.
Covered:
230°C / 450°F for 30 minutes
Then remove the lid.
Uncovered:
Bake another 10–15 minutes.
For the deep golden-brown crust shown in your photo, allow it to become nicely browned rather than removing it when it’s still pale.
Similar garlic-herb Dutch-oven loaves use about 30 minutes covered followed by 10–20 minutes uncovered.
R
RecipeTables
+1
10. How do I know it’s done?
The loaf should be:
deep golden brown
firm and crisp
hollow-sounding when tapped underneath
For the most reliable result, the center should reach approximately:
99°C / 210°F
An instant-read thermometer is an excellent way to check doneness.
K
Kitchn
11. DON’T cut immediately
Remove the bread from the Dutch oven and place it on a wire rack.
Wait at least 30 minutes.
For the best crumb, I’d recommend 45–60 minutes.
If you cut it immediately, the interior can become gummy because the crumb is still setting.
Optional: extra-garlic buttery crust
If you want the loaf to taste more like the photograph’s rich, savory version, mix:
1 tbsp melted butter
1 tbsp olive oil
1 minced garlic clove
1 tsp parsley
pinch of salt
Brush a very thin layer over the hot bread immediately after baking.
Don’t soak the crust—otherwise you’ll lose some of that crunch.
Optional Parmesan version
For a richer loaf, add:
40–50 g grated Parmesan to the dough
And sprinkle another 1–2 tbsp Parmesan over the top before baking.
This gives you a garlic-Parmesan-herb loaf. Parmesan is also used in other rustic garlic-herb bread variations.
Y
YouTube
Best herb combination
For the flavor I would recommend:
Fresh herbs
Rosemary — 1 tbsp
Thyme — 1 tbsp
Parsley — 1 tbsp
Or an easy dried-herb mixture
Rosemary — 1 tsp
Thyme — 1 tsp
Oregano — ½ tsp
Basil — ½ tsp
Fresh herbs generally give a brighter flavor, while dried herbs are more concentrated.
Why is my dough so sticky?
That’s normal.
This is a high-hydration dough.
Don’t keep adding flour until it becomes a dry dough.
Instead:
flour your hands
flour the work surface
use a dough scraper
fold the dough
use parchment paper
Adding too much flour is one of the easiest ways to turn this loaf from light and airy into dense bread.
Full Q&A / Troubleshooting
Q: Can I make this without a Dutch oven?
Yes.
Put the dough on a baking tray or pizza stone and place a separate metal pan on the lower rack.
When you put the bread in, carefully add hot water to that pan to generate steam.
Bake around 220–230°C / 425–450°F, adjusting according to your oven.
The Dutch oven is simply the easiest way to create steam.
Q: Can I use bread flour?
Yes.
Bread flour will generally produce a chewier loaf.
All-purpose/plain flour produces a slightly softer, more tender crumb.
For the loaf in your photo, either works.
Q: Can I use whole-wheat flour?
Yes, but don’t replace all the flour initially.
Try:
300 g white flour + 75 g whole-wheat flour.
Whole-wheat flour absorbs more water and can make the loaf denser.
Q: Can I use active dry yeast?
Yes.
Use approximately 1¼ tsp active dry yeast.
If desired, dissolve it in some of the lukewarm water first and let it stand for about 5 minutes.
Q: My yeast isn’t working. Why?
Possible causes:
water was too hot
yeast is old
room is too cold
insufficient rising time
Water should be warm, not hot.
Q: Can I use garlic powder?
Yes.
Use approximately:
1–2 tsp garlic powder
instead of fresh garlic.
However, fresh or roasted garlic gives a much better flavor.
Q: Can I use butter instead of olive oil?
Yes.
Use melted butter in approximately the same quantity.
Olive oil gives a more Mediterranean/artisan flavor; butter makes it richer.
Q: Can I add cheese?
Absolutely.
Good choices include:
Parmesan
cheddar
mozzarella
Gruyère
Asiago
For this loaf, Parmesan is my first choice because it doesn’t add excessive moisture.
Q: Can I add jalapeños?
Yes.
Add approximately:
2–3 tbsp finely chopped fresh or pickled jalapeño.
Pat pickled jalapeños dry first.
Q: Can I add olives?
Yes.
Use approximately:
½ cup chopped, well-drained olives.
Kalamata olives work particularly well with rosemary and garlic.
Q: Why didn’t my bread rise?
Check:
Yeast wasn’t active.
Water was too hot.
Room was too cold.
Dough wasn’t given enough time.
Too much flour was added.
Don’t judge the dough only by the clock. Look for visible expansion and bubbles.
Q: Why is my bread dense?
The most common reasons are:
insufficient fermentation
too much flour
dead yeast
dough was heavily kneaded
bread was cut while hot
whole-wheat flour was used in a large proportion
Q: Why did the crust become soft?
Usually because moisture became trapped after baking.
Cool the loaf uncovered on a wire rack.
Don’t put hot bread immediately into a sealed container.
For maximum crunch, let it cool completely on the rack. Similar no-knead recipes specifically recommend cooling uncovered for a crustier exterior.
I
I Heart Eating
Q: How do I make the crust softer?
Once the loaf has cooled for several minutes, place it loosely into a food-safe bag/container.
Trapped moisture will soften the crust.
Q: How should I store it?
At room temperature, keep it in a bread bag or loosely wrapped.
Best quality is generally within 1–3 days. Similar garlic-herb loaves recommend about three days at room temperature.
K
Kitchn
+1
Avoid refrigerating ordinary bread if possible—the refrigerator can make the crumb stale faster.
Q: Can I freeze it?
Yes.
Cool completely, then:
Don’t put hot bread immediately into a sealed container.
For maximum crunch, let it cool completely on the rack. Similar no-knead recipes specifically recommend cooling uncovered for a crustier exterior.
I
I Heart Eating
Q: How do I make the crust softer?
Wrap tightly in plastic/freezer wrap.
Put into a freezer bag.
Freeze for up to about 2–3 months for best quality.
You can freeze it whole or slice it first.
Approximate nutrition
For the basic loaf, without Parmesan or butter, the approximate nutrition per 1/10 loaf is:
Nutrition Approx.
Calories 150–180 kcal
Carbohydrates 29–32 g
Protein 4–5 g
Fat 2–4 g
Fiber 1–2 g
Sodium 300–400 mg
These are estimates, because the final numbers change substantially with the exact flour, salt, oil, garlic and serving size. Published versions of similar garlic-herb no-knead bread also give estimated nutrition rather than laboratory measurements.
I
I Heart Eating
Allergens
Wheat/gluten: yes
Dairy: no in the basic recipe
Egg: no
Nuts: no
Peanuts: no
Soy: normally no, but check flour/add-in labels
Sesame: only if you add sesame seeds
My recommended version for the photo
If your goal is to get as close as possible to the pictured loaf, I’d make it this way:
375 g flour + 360 ml water + 1 tsp instant yeast + 1½ tsp salt + 1 tsp honey + 1 tbsp olive oil + 5 cloves roasted/minced garlic + 1 tbsp rosemary + 1 tbsp thyme + 1 tbsp parsley.
Ferment overnight, shape gently, rest 30–45 minutes, then bake in a preheated Dutch oven at 230°C/450°F for 30 minutes covered + 12–15 minutes uncovered.
The result should be crisp and deeply golden outside, fragrant with garlic and herbs, and soft/chewy inside—the closest match to the rustic loaf shown in your image.
K
Kitchn
+1
Pro tip: If you want those beautiful irregular holes visible when you cut the loaf, weigh the flour and don’t add extra flour just because the dough feels sticky. That one detail makes a huge difference.

With years of experience in restaurant research and local SEO, Sara creates accurate, user-friendly guides that work for both people and search engines. Her goal is to help users go from search results to their nearest restaurant or menu choice with as few clicks as possible.
- Grandma’s Cream Puffs – Light, Crisp & Creamy - October 17, 2026
- Easy Crockpot Creamy Garlic Parmesan Chicken - October 17, 2026
- Garlic Herb Roasted Potatoes - October 17, 2026