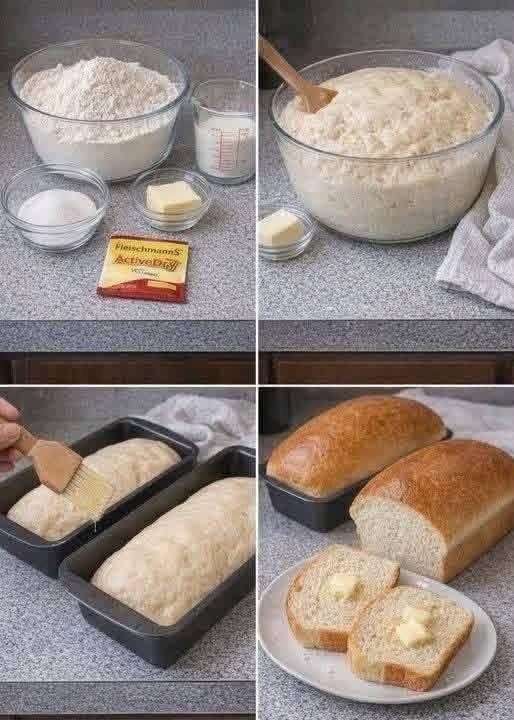
A simple recipe for two soft, fluffy white bread loaves with a golden crust and tender, buttery inside. Perfect for breakfast, sandwiches, toast, or serving with tea.
1. Recipe information
Preparation time: 25 minutes
First rise: 60–90 minutes
Second rise: 30–60 minutes
Baking time: 25–35 minutes
Total time: Approximately 2½–3½ hours
Yield: 2 medium loaves
Oven temperature: 180°C (350°F)
Difficulty: Easy to moderate
2. Ingredients
Ingredient
Quantity
All-purpose flour or bread flour
600 g
Lukewarm milk
350 ml
Instant dry yeast
7 g
Sugar
40 g
Salt
10 g
Unsalted butter, softened
50 g
Extra milk for brushing
1–2 tbsp
Extra butter for brushing after baking
Optional
Measurements without a kitchen scale:
Flour: approximately 5 cups, depending on how it is measured
Sugar: approximately 3 tablespoons plus 1 teaspoon
Instant yeast: approximately 2¼ teaspoons
Salt: approximately 1¾ teaspoons
Butter: approximately 3½ tablespoons
For the best results, weigh the flour rather than measuring it by volume.
3. Step-by-step instructions
Step 1: Prepare the milk and yeast
Warm the milk to approximately 35–38°C. It should feel lukewarm, not hot.
If using instant yeast, you can mix it directly with the flour. If using active dry yeast, stir it into the warm milk with a teaspoon of the measured sugar and leave for 5–10 minutes until foamy.
Step 2: Mix the ingredients
Add the flour, yeast, sugar, and salt to a large mixing bowl.
Pour in the lukewarm milk.
Mix until a rough dough forms.
Add the softened butter.
Mix until the butter is incorporated.
The dough may initially feel sticky. This is normal.
Step 3: Knead the dough
Knead on a clean work surface for approximately 10–15 minutes by hand, or 7–10 minutes using a stand mixer with a dough hook.
The dough should become:
Smooth and elastic.
Soft and slightly tacky.
Stretchy without immediately tearing.
Avoid adding too much extra flour, as this can make the bread dry and heavy.
Step 4: First rise
Lightly grease a large bowl.
Place the dough inside and turn it once to coat the surface lightly.
Cover with a clean towel or plastic wrap.
Leave in a warm place for 60–90 minutes, or until approximately doubled in size.
The rising time depends on your kitchen temperature.
Step 5: Shape the loaves
Gently press the dough to release large air bubbles.
Divide it into two equal portions.
Flatten each portion into a rectangle.
Fold the sides inward and roll tightly into a loaf shape.
Pinch the seam closed.
Place each loaf seam-side down into a greased loaf pan.
Loaf pans around 20 × 10 cm (8 × 4 inches) work well.
Step 6: Second rise
Cover the pans loosely and leave them in a warm place for 30–60 minutes.
The dough should look puffy and rise to around 1–2 cm above the pan rim, depending on the pan size.
Do not let it rise excessively, as overproofed bread can collapse during baking.
Step 7: Bake the bread
Preheat your oven to 180°C (350°F).
Brush the tops lightly with milk, if desired.
Place the pans on the middle oven rack.
Bake for 25–35 minutes, until the loaves are golden brown.
If the tops brown too quickly, cover them loosely with foil.
For a reliable doneness check, the center of the bread should reach approximately 90–95°C.
Step 8: Brush and cool
Remove the pans from the oven.
Leave the loaves in their pans for 5–10 minutes.
Transfer them to a wire rack.
Brush the tops with a little butter for a soft, flavorful crust.
Allow the bread to cool for at least 45–60 minutes before slicing.
Enjoy your homemade bread with butter, jam, honey, eggs, or sandwich fillings.
4. Secrets to soft, fluffy bread
Use lukewarm milk: Hot milk can damage the yeast.
Knead properly: Good gluten development helps the bread rise and hold its shape.
Keep the dough soft: Too much flour creates a dense loaf.
Allow enough rising time: Judge by the dough’s size and appearance rather than the clock alone.
Avoid overbaking: Excessive baking dries out the crumb.
Brush with butter after baking: This helps create a softer crust.
Cool before slicing: Hot bread can become compressed or gummy when cut.
5. Common problems and solutions
Problem
Likely cause
Solution
Bread is dense
Too much flour or insufficient kneading
Keep the dough soft and knead until elastic
Dough does not rise
Inactive yeast or cold conditions
Check yeast freshness and allow more time
Bread is hard
Overbaking or excess flour
Check doneness and measure flour accurately
Loaf collapses
Overproofing or underbaking
Shorten the second rise if necessary
Bread is gummy inside
Underbaking or slicing too early
Bake thoroughly and cool before cutting
Crust is too hard
Dry baking conditions or prolonged baking
Brush with butter and avoid overbaking
6. Frequently asked questions
Q1. Can I use water instead of milk?
Yes. Use 350 ml lukewarm water. The bread will be less rich but can still be soft.
Q2. Can I use oil instead of butter?
Yes. Replace the 50 g butter with approximately 40 g neutral vegetable oil. The flavor and texture will be slightly different.
Q3. Can I use whole-wheat flour?
You can replace about 25–30% of the white flour with whole-wheat flour. A 100% whole-wheat loaf usually needs adjustments to the liquid and kneading.
Q4. Why is my dough sticky?
Bread dough often starts sticky. Kneading develops its structure. If it remains excessively wet after kneading, add flour gradually, one tablespoon at a time.
Q5. Can I prepare the dough overnight?
Yes. After kneading, cover and refrigerate it overnight. The following day, allow it to warm and become puffy, shape it, complete the final rise, and bake.
Q6. How do I store homemade bread?
Once completely cool, store in an airtight bag or bread container at room temperature for approximately 2–3 days.
Q7. Can I freeze this bread?
Yes. Slice the cooled bread, place it in a freezer-safe bag, and freeze for up to about 3 months for good quality. Toast slices directly from frozen if desired.
Q8. Can I make this recipe without a mixer?
Absolutely. A large bowl, wooden spoon, and your hands are enough. Knead until the dough becomes smooth and elastic.
Q9. How do I get a softer crust?
Brush the loaf with butter after baking and cover it loosely with a clean towel while cooling.
Q10. How do I know the bread is fully baked?
The crust should be golden brown, and the center should reach approximately 90–95°C on a food thermometer.
7. Approximate nutrition information
Per 100 g of finished bread:
Nutrient
Approximate amount
Calories
260–290 kcal
Carbohydrates
45–50 g
Protein
7–9 g
Fat
4–6 g
Fiber
1.5–2.5 g
Sugar
3–6 g
Sodium
300–450 mg
These values are estimates and vary according to the flour, milk, salt, and final moisture content.
8. Ingredient checklist
Final tip: For the softest homemade white bread, the key is a properly kneaded, slightly tacky dough, two well-timed rises, and careful baking. This will give you two lovely loaves suitable for everyday sandwiches and toast.

With years of experience in restaurant research and local SEO, Sara creates accurate, user-friendly guides that work for both people and search engines. Her goal is to help users go from search results to their nearest restaurant or menu choice with as few clicks as possible.
- Mint Chocolate Chip Ice Cream - October 23, 2026
- Cheesy Seafood Stuffed Crab Bombs - October 23, 2026
- Homemade Soft White Bread - October 23, 2026