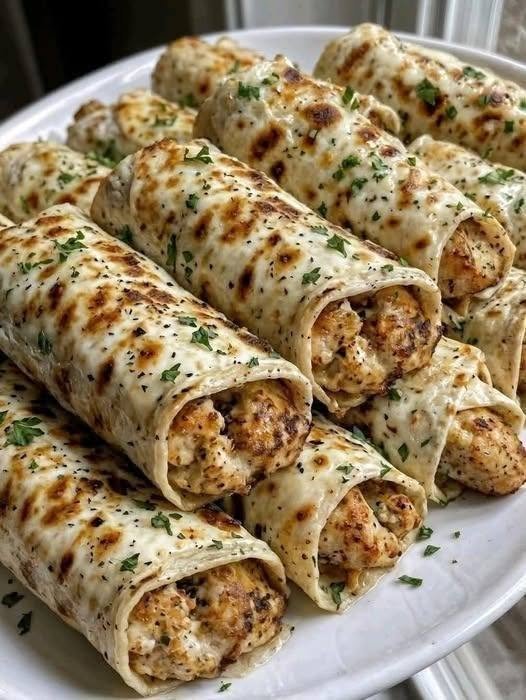
Tender, juicy garlic-seasoned chicken wrapped in warm tortillas with gooey melted cheese, crisp lettuce, and a creamy garlic sauce. These homemade Cheesy Garlic Chicken Wraps are packed with flavor, easy to prepare, and perfect for lunch, dinner, meal prep, or a satisfying family meal.
Servings: 4 wraps
Prep Time: 15 minutes
Cook Time: 20 minutes
Total Time: 35 minutes
Course: Lunch or Dinner
Cuisine: American-Inspired
Difficulty: Easy
Ingredients
For the Garlic Chicken
– 1 pound (450 g) boneless, skinless chicken breasts, cut into bite-sized strips
– 2 tablespoons olive oil
– 4 cloves garlic, minced
– 1 teaspoon paprika
– 1 teaspoon garlic powder
– ½ teaspoon onion powder
– 1 teaspoon Italian seasoning
– ½ teaspoon black pepper
– ¾ teaspoon salt, or to taste
– ½ teaspoon chili powder, optional
– 1 tablespoon lemon juice
– 1 tablespoon unsalted butter
For the Cheesy Filling
– 1 cup (100–110 g) shredded cheddar cheese
– 1 cup (100–110 g) shredded mozzarella cheese
– ¼ cup (25 g) grated Parmesan cheese
– ½ small red onion, thinly sliced
– 1 small red bell pepper, thinly sliced
– 1 cup shredded lettuce
– 1 medium tomato, diced and drained
– 2 tablespoons chopped fresh parsley
For the Creamy Garlic Sauce
– ½ cup mayonnaise
– ¼ cup sour cream or plain Greek yogurt
– 2 cloves garlic, finely minced
– 1 tablespoon lemon juice
– 1 teaspoon Dijon mustard, optional
– 1 tablespoon chopped fresh parsley
– ¼ teaspoon black pepper
– ¼ teaspoon salt, or to taste
– 1–2 teaspoons water, if needed to thin the sauce
For the Wraps
– 4 large flour tortillas, approximately 10 inches each
– 1 tablespoon butter or olive oil, for toasting
– ¼ teaspoon garlic powder, optional, for the tortilla coating
– Extra grated Parmesan cheese, optional
Ingredient Notes and Substitutions
– Chicken breasts: Boneless, skinless chicken breasts are lean and cook quickly. Boneless chicken thighs can be used for a juicier result.
– Garlic: Fresh garlic provides the strongest flavor. Garlic powder adds an even, savory seasoning throughout the chicken.
– Cheddar cheese: Gives the wraps a rich, sharp cheesy flavor.
– Mozzarella cheese: Melts beautifully and creates a stretchy, gooey filling.
– Parmesan cheese: Adds a salty, nutty flavor that complements the garlic.
– Tortillas: Large flour tortillas are easiest to fold without tearing. Whole-wheat tortillas are another option.
– Mayonnaise and sour cream: Make a creamy, tangy garlic sauce. Greek yogurt can replace some or all of the sour cream.
– Vegetables: Lettuce, tomatoes, bell peppers, and onions add freshness and crunch. You can omit any vegetables you dislike.
– Spice level: Leave out the chili powder for a mild wrap or add red pepper flakes for extra heat.
Equipment Needed
– Large skillet or frying pan
– Cutting board and sharp knife
– Mixing bowls
– Measuring cups and spoons
– Spatula or tongs
– Cheese grater
– Clean plate for resting the chicken
Instructions
Step 1: Prepare the Chicken
Pat the chicken breasts dry with paper towels and cut them into thin strips or bite-sized pieces.
Place the chicken in a mixing bowl. Add the olive oil, minced garlic, garlic powder, paprika, onion powder, Italian seasoning, black pepper, salt, chili powder if using, and lemon juice.
Mix thoroughly until every piece of chicken is coated with the seasoning.
Allow the chicken to marinate for 10–15 minutes while you prepare the remaining ingredients. If marinating for longer, refrigerate it.
Step 2: Prepare the Creamy Garlic Sauce
In a small bowl, combine the mayonnaise, sour cream or Greek yogurt, minced garlic, lemon juice, Dijon mustard if using, parsley, black pepper, and salt.
Whisk until smooth and creamy.
If the sauce is too thick, add 1 teaspoon of water at a time until it reaches a consistency that can be easily spread inside the wraps.
Taste and adjust the garlic, lemon, and seasoning as desired.
Cover and refrigerate until ready to assemble. Chilling for 10–15 minutes helps the flavors blend together.
Step 3: Cook the Garlic Chicken
Heat a large skillet over medium-high heat.
Add the seasoned chicken in a single layer. Cook for approximately 5–8 minutes, turning occasionally, until the pieces are golden on the outside and cooked through. Work in batches if necessary to avoid overcrowding.
Reduce the heat to medium-low. Add the butter and stir gently as it melts around the chicken.
Cook for another 30–60 seconds, allowing the garlic butter to coat the chicken.
Check the thickest pieces with a food thermometer. Chicken must reach an internal temperature of 165°F (74°C).
Remove the chicken from the skillet and let it rest for 3–5 minutes.
Step 4: Prepare the Vegetables
Thinly slice the red onion and bell pepper.
Shred the lettuce, dice the tomato, and chop the parsley.
If the tomato is particularly juicy, drain the excess liquid so the wraps do not become soggy.
For softer vegetables, sauté the bell pepper and onion in the same skillet for 3–4 minutes until slightly tender. Alternatively, leave them raw for a crisp, fresh texture.
Step 5: Warm the Tortillas
Heat a clean skillet over medium heat.
Warm each tortilla for approximately 15–30 seconds per side until soft and flexible.
Do not overheat them, as dry tortillas can crack when folded.
Place the warmed tortillas on a plate and cover them with a clean kitchen towel while preparing the filling.
Step 6: Add the Garlic Sauce
Lay one tortilla flat on a clean surface.
Spread approximately 1 tablespoon of creamy garlic sauce down the center, leaving a border around the edges for folding.
Add a small handful of shredded lettuce, followed by some bell pepper, onion, and diced tomato.
Avoid adding too much sauce or wet vegetables, as excess moisture can make the tortilla difficult to seal.
Step 7: Add the Chicken and Cheese
Divide the cooked garlic chicken evenly among the four tortillas.
Sprinkle each wrap with cheddar, mozzarella, and Parmesan cheese.
For extra-melty cheese, place the chicken and cheese in the warm skillet for a few seconds before assembling, or briefly return the filled wrap to the pan during the final toasting step.
Add a little extra parsley for freshness.
Step 8: Fold the Wraps
Fold the left and right sides of each tortilla inward over the filling.
Bring the bottom edge up and over the filling, then roll tightly toward the top to create a secure wrap.
Keep the filling centered and avoid overstuffing the tortillas. This helps prevent the cheese and sauce from spilling out during toasting.
Step 9: Toast Until Golden and Crispy
Heat a clean skillet over medium heat and lightly brush it with butter or olive oil.
Place each wrap seam-side down in the skillet.
Cook for approximately 2–3 minutes per side, pressing gently with a spatula, until the tortilla becomes golden and crisp and the cheese melts.
If desired, mix a little garlic powder into the melted butter and brush a small amount over the outside of the tortillas before toasting.
Watch carefully to prevent the tortilla from burning.
Step 10: Slice and Serve
Transfer the wraps to a cutting board and allow them to rest for 1–2 minutes.
Slice each wrap diagonally in half using a sharp knife.
Serve immediately with extra creamy garlic sauce for dipping. The contrast between the crispy tortilla, juicy chicken, melted cheese, fresh vegetables, and creamy sauce makes every bite delicious.
Tips for the Best Cheesy Garlic Chicken Wraps
1. Cut the chicken into evenly sized pieces so everything cooks at the same rate.
2. Use fresh garlic for a deeper, more aromatic flavor.
3. Do not overcrowd the skillet; cook the chicken in batches if necessary.
4. Grate cheese from a block when possible for smoother melting.
5. Drain watery vegetables before assembling the wraps.
6. Keep the filling in the center so the tortillas fold neatly.
7. Toast the wraps seam-side down first to help seal them.
8. Use medium heat for the final toast so the cheese melts before the tortilla becomes too dark.
9. Add lettuce after cooking the chicken to preserve its crunch.
10. Serve the wraps immediately for the best crispy texture.
Nutritional Information
Estimated nutrition per wrap, assuming four servings and using the listed ingredients, including the creamy garlic sauce:
– Calories: 650–780
– Protein: 42–52 g
– Total Fat: 35–45 g
– Saturated Fat: 12–17 g
– Carbohydrates: 38–50 g
– Dietary Fiber: 2–5 g
– Total Sugars: 3–6 g
– Cholesterol: 125–165 mg
– Sodium: 950–1,400 mg
– Potassium: 600–850 mg
Nutrition values vary by tortilla size, cheese brands, mayonnaise, and the amount of sauce used. These are estimates, not laboratory-tested values.
Dietary and Allergen Information
– Dairy: Contains cheddar, mozzarella, Parmesan, butter, and sour cream unless substituted.
– Eggs: Standard mayonnaise usually contains eggs.
– Gluten: Regular flour tortillas contain wheat and gluten. Use certified gluten-free wraps if required.
– Nuts: No peanuts or tree nuts are intentionally included in the recipe. Check packaged ingredients and allergen statements for possible cross-contact.
– High-protein: Chicken and cheese provide substantial protein.
– Lower-calorie option: Use less cheese and sauce, choose reduced-fat cheese, and replace mayonnaise with plain Greek yogurt.
– Lower-carb option: Use low-carb tortillas and reduce or omit the tomato and onion if needed for your preferred carbohydrate target.
– Spicy option: Add cayenne pepper, chili flakes, or hot sauce to the chicken.
Storage Instructions
Refrigerator: Store leftover cooked chicken and assembled wraps in airtight containers within 2 hours of cooking. Refrigerate for 3–4 days. For the best texture, store the chicken, vegetables, sauce, and tortillas separately and assemble when ready to eat.
Freezer: Cooked, seasoned chicken can be frozen in a freezer-safe container for up to 2–3 months for best quality. Fully assembled wraps containing lettuce, tomato, and creamy sauce are not ideal for freezing because the vegetables become watery.
Reheating: Reheat the chicken in a skillet or microwave until heated through. Assemble the wrap with fresh vegetables and sauce, then toast it in a skillet or air fryer until crisp. Reheat cooked chicken leftovers to 165°F (74°C).
Avoid leaving chicken or mayonnaise-based sauce at room temperature for more than 2 hours.
Frequently Asked Questions
1. Can I use chicken thighs instead of chicken breasts?
Yes. Boneless, skinless chicken thighs are an excellent substitute and often produce a juicier filling. Cut them into evenly sized strips and cook until they reach 165°F (74°C).
2. Can I prepare these wraps ahead of time?
Yes. Cook the chicken, prepare the sauce, and chop the vegetables ahead of time. Store each component separately in the refrigerator, then assemble and toast the wraps shortly before serving.
3. How do I keep the wraps from becoming soggy?
Drain juicy vegetables, avoid using too much sauce, and keep wet ingredients away from the tortilla until assembly. Toast the wraps just before serving.
4. Which cheese combination works best?
Cheddar provides a bold flavor, mozzarella creates a stretchy melt, and Parmesan adds a savory finish. You can adjust the proportions to your preference.
5. Can I make these wraps spicy?
Yes. Add chili powder, cayenne pepper, sliced jalapeños, or hot sauce to the chicken or garlic sauce.
6. Can I use store-bought garlic sauce?
Absolutely. Store-bought garlic sauce can save time. Choose one you enjoy and adjust the seasoning of the chicken to complement it.
7. Can I cook the chicken in an air fryer?
Yes. Arrange the seasoned chicken in a single layer and air-fry at approximately 375°F (190°C) for 10–15 minutes, turning halfway through. Cooking time depends on the size of the pieces. Verify that the chicken reaches 165°F (74°C).
8. Can I make these wraps without mayonnaise?
Yes. Replace the mayonnaise with plain Greek yogurt or a suitable egg-free mayonnaise. Greek yogurt produces a tangier sauce with a different texture.
9. What vegetables can I add?
Spinach, shredded cabbage, roasted red peppers, cucumbers, mushrooms, and caramelized onions are all good choices. Cook watery vegetables before adding them when appropriate.
10. Can I make these wraps gluten-free?
Yes. Use certified gluten-free tortillas and verify that all sauces and seasonings meet your requirements. Prevent cross-contact during preparation.
11. How can I make the wraps extra cheesy?
Increase the mozzarella slightly or add a little extra cheddar. Toast the assembled wraps over medium heat until the cheese melts completely.
12. What can I serve with Cheesy Garlic Chicken Wraps?
Serve them with potato wedges, sweet potato fries, coleslaw, a fresh garden salad, roasted vegetables, or a cup of tomato soup.
13. Can I use leftover roasted chicken?
Yes. Shred or slice the cooked chicken and warm it in a skillet with garlic, butter, paprika, and a splash of lemon juice before assembling.
14. Why does my tortilla tear when folding?
The tortilla may be cold, dry, or overfilled. Warm it briefly in a skillet before filling, and avoid placing too much filling near the edges.
15. How do I get a restaurant-style crispy wrap?
Brush the outside lightly with butter, place the wrap seam-side down in a preheated skillet, and cook over medium heat until both sides are golden. Press gently with a spatula for even contact.
Serving Suggestions
– Classic lunch: Serve with crispy potato wedges and extra garlic sauce.
– Fresh and light: Pair with a cucumber and tomato salad.
– Family dinner: Add roasted broccoli or steamed green beans.
– Spicy version: Serve with jalapeños and spicy garlic dipping sauce.
– Party platter: Slice the wraps into smaller pieces and arrange them with dipping sauces for sharing.
Recipe Notes
– For the most tender chicken, avoid cooking it beyond the recommended safe temperature.
– Use freshly grated cheese for the best melting texture.
– Keep the sauce refrigerated until serving.
– If using pre-cooked chicken, warm it thoroughly without drying it out.
–

With years of experience in restaurant research and local SEO, Sara creates accurate, user-friendly guides that work for both people and search engines. Her goal is to help users go from search results to their nearest restaurant or menu choice with as few clicks as possible.
- Grandma’s Cream Puffs – Light, Crisp & Creamy - October 17, 2026
- Easy Crockpot Creamy Garlic Parmesan Chicken - October 17, 2026
- Garlic Herb Roasted Potatoes - October 17, 2026