Yield: 8–10 servings
Pan: 8-inch / 20-cm square container or springform pan
Prep: 30–40 minutes
Chilling: 6–8 hours, preferably overnight
Difficulty: Easy–medium
1. Ingredients
A. Biscuit crust
250 g digestive biscuits or graham crackers
100 g unsalted butter, melted
2 tbsp brown or white sugar
1 tsp vanilla extract
Pinch of salt
Optional nutty crust
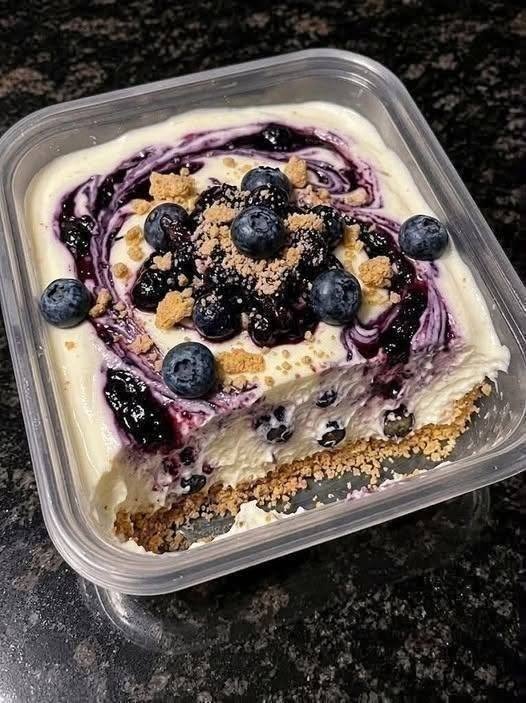
For the slightly crunchy/nutty character visible in the photo, add:
40 g finely ground almonds
or 40 g ground walnuts
or 40 g pecans
If using nuts, reduce the biscuits to 210 g so the total dry crust remains about the same.
Nut-free version: Simply omit the nuts and use 250 g biscuits.
2. Creamy cheesecake filling
450 g full-fat cream cheese, softened
200 ml cold heavy whipping cream
100 g powdered/icing sugar
1 tsp vanilla extract
1 tbsp lemon juice
1 tsp finely grated lemon zest
150 g thick Greek yogurt or sour cream
10 g powdered gelatin + 50 ml cold water
Vegetarian alternative
Instead of gelatin, use:
5–6 g agar-agar, prepared according to the manufacturer’s instructions.
The texture will be slightly firmer than gelatin cheesecake.
3. Blueberry filling/swirl
300 g blueberries, fresh or frozen
70 g sugar
1 tbsp lemon juice
1 tsp lemon zest
1 tsp cornstarch
1 tbsp water
½ tsp vanilla extract
For the strongest blueberry flavor, use a mixture of whole blueberries and blueberry compote.
4. Topping
100–150 g fresh blueberries
2–3 tbsp blueberry sauce
2–3 tbsp crushed biscuits
2 tbsp chopped almonds, walnuts, or pecans optional
1–2 tbsp toasted coconut optional
A small amount of powdered sugar, optional
For the look in your photograph, I would use blueberries + crushed biscuit crumbs + finely chopped toasted nuts.
Step-by-Step Recipe
Step 1 — Make the blueberry compote
Put into a saucepan:
300 g blueberries
70 g sugar
1 tbsp lemon juice
lemon zest
Cook over medium heat for approximately 5–8 minutes.
Stir occasionally.
The berries should break down and release their juice while some berries remain whole.
Mix:
1 tsp cornstarch + 1 tbsp water
until smooth.
Add it to the blueberries and cook for another 1–2 minutes, stirring constantly.
Remove from the heat and add vanilla.
You want a thick but spoonable blueberry sauce.
Allow the cheesecake filling. It can melt the cream and it to cool completely.
Important
Do not pour hot blueberry sauce onto the cheesecake filling. It can melt the cream and ruin the layers.
Step 2 — Make the biscuit base
Crush the biscuits into fine crumbs.
You can use:
food processor
blender
rolling pin and zip-lock bag
Mix with:
melted butter
sugar
vanilla
salt
If using nuts, mix in your finely ground almonds/walnuts/pecans.
The mixture should resemble wet sand.
Test
Take a handful and squeeze it.
It should hold together.
If it is too dry, add another 1–2 teaspoons melted butter.
Step 3 — Form the crust
Line your container/pan with parchment paper if possible.
Press the biscuit mixture firmly into the bottom.
Use the bottom of a glass or measuring cup to compact it.
For the dessert in the photo, make the crust approximately:
1–1.5 cm thick.
Refrigerate for 20–30 minutes.
Step 4 — Prepare the gelatin
Sprinkle:
10 g gelatin
over:
50 ml cold water.
Leave it for about 5 minutes to bloom.
Then gently warm it until completely dissolved.
Do not boil gelatin.
Allow it to cool slightly while preparing the cheesecake mixture.
Step 5 — Make the cheesecake filling
Beat the softened cream cheese until smooth.
Add:
powdered sugar
vanilla
lemon juice
lemon zest
Greek yogurt/sour cream
Beat until completely smooth.
Do not overbeat.
Step 6 — Whip the cream
In another bowl, whip:
200 ml cold heavy cream
until it reaches soft-to-medium peaks.
Don’t whip it until it becomes grainy or buttery.
Step 7 — Combine
Take a few spoonfuls of the cream-cheese mixture and mix them into the slightly cooled gelatin.
This helps prevent gelatin lumps.
Then slowly mix the gelatin mixture into the remaining cream-cheese mixture.
Finally, gently fold in the whipped cream.
You should have a thick, smooth cheesecake mixture.
Step 8 — Create the blueberry swirl
Spread approximately ⅔ of the cheesecake mixture over the chilled crust.
Add several spoonfuls of cooled blueberry compote.
Don’t completely cover the surface.
Add the remaining cheesecake mixture.
Then add more blueberry sauce.
Using a skewer, knife, or chopstick, gently make swirling motions through the cheesecake.
Don’t over-swirl.
You want distinct purple blueberry ribbons like the dessert in your photograph.
Step 9 — Chill
Refrigerate for at least:
6–8 hours
but overnight is best.
Do not rely on the freezer to set it unless you’re deliberately making a frozen cheesecake.
Step 10 — Decorate
Once fully set, add:
fresh blueberries
blueberry compote
biscuit crumbs
chopped toasted nuts, if desired
For the photograph’s appearance, pile blueberries fairly generously in the center and scatter crumbs around them.
You can also make a few large blueberry swirls on top.
Complete Nut Information
This is important because the photograph alone cannot establish whether the original dessert contains nuts.
Nuts that work well
Nut Flavor Best use
Almond Mild, slightly sweet Crust/topping
Walnut Rich, slightly bitter Crust/topping
Pecan Sweet, buttery Topping
Hazelnut Strong, roasted Crust/topping
Pistachio Sweet, distinctive Decoration
My recommendation
For this particular cheesecake:
40 g ground almonds in the crust + 20–30 g toasted chopped almonds on top.
This gives the crunchy appearance without making the cheesecake overwhelmingly nutty.
Nut allergy
If serving someone with a nut allergy:
Don’t use almonds.
Don’t use walnuts.
Don’t use pecans.
Don’t use hazelnuts.
Don’t use pistachios.
Check the biscuit/graham cracker label.
Check the chocolate or toppings if using them.
Avoid products carrying a “may contain nuts/tree nuts” warning if the allergy is severe.
Prevent cross-contamination from knives, processors, cutting boards and containers.
For a serious allergy, use certified nut-free ingredients and equipment practices rather than simply removing nuts from the recipe.
Dairy-Free Version
Use:
dairy-free cream cheese
plant-based whipping cream
dairy-free yogurt
plant-based butter
Check that the biscuits are dairy-free as well.
Egg-Free
d news: this recipe is naturally egg-free.
Gluten-Free
Use certified gluten-free biscuits/graham crackers.
The remaining ingredients are generally naturally gluten-free, but always check packaged ingredients for cross-contamination if necessary.
Sugar-Free / Lower-Sugar Option
You can reduce the sugar considerably.
For the filling, use approximately:
60–70 g powdered sweetener instead of 100 g sugar, depending on the sweetener.
For the blueberry compote, use:
30–40 g sugar or an appropriate heat-stable sweetener.
Keep in mind that reducing sugar changes both sweetness and texture slightly.
Recipe Q&A
Q: Can I use frozen blueberries?
Yes. They’re excellent for the cooked blueberry sauce.
For the decoration, however, use fresh blueberries if possible. Frozen berries become soft and watery after thawing.
Q: Can I make this without gelatin?
Yes.
Use agar-agar or make a softer refrigerator cheesecake using only cream cheese and whipped cream.
However, without a setting agent, the cheesecake will be much softer and won’t produce the clean slice shown in the photograph.
Q: Why is my cheesecake not setting?
Possible causes:
Too much liquid.
Insufficient gelatin/agar.
Gelatin wasn’t properly dissolved.
Gelatin was added while extremely hot.
The cheesecake wasn’t chilled long enough.
Low-fat cream cheese was used.
The whipped cream was over- or under-whipped.
Overnight refrigeration is the safest option.
Q: Can I use cream instead of Greek yogurt?
Yes.
You can replace the 150 g yogurt with another 100–150 g cream cheese, producing a richer, denser cheesecake.
Q: Can I use mascarpone?
Yes. Replace approximately 100–150 g of cream cheese with mascarpone.
It produces a richer and silkier filling.
Q: Can I bake the crust?
Yes.
For a firmer crust, bake it at:
175°C / 350°F for 8–10 minutes.
Cool completely before adding the filling.
Q: Can I make it in a plastic food container like the photograph?
Yes, provided the container is food-safe and suitable for refrigeration.
A springform pan is better if you want a perfectly clean presentation.
Q: How long does it last?
Keep refrigerated and consume within approximately 3–4 days.
Keep it covered to prevent it absorbing refrigerator odors.
Q: Can I freeze it?
Yes.
Freeze it without the fresh blueberry topping for approximately 1 month for best quality.
Thaw overnight in the refrigerator.
The texture may be slightly different after freezing.
Q: Why did my blueberry color turn completely purple?
You probably mixed the blueberry sauce too thoroughly into the cheesecake.
For the appearance in the photo, add the sauce in small patches and swirl only a few times.
Q: How do I get those dramatic purple streaks?
After adding blueberry sauce, use a thin knife or skewer and make:
S-shaped → circular → S-shaped
movements.
Stop after a few strokes.
The less you mix, the more dramatic the marbling.
Q: How do I make the crunchy topping?
Toast chopped almonds, pecans, or walnuts in a dry pan over low-medium heat for 3–5 minutes, stirring frequently.
Cool completely, then combine with crushed biscuits.
Sprinkle immediately before serving.
Best version for the photo
If your goal is to reproduce the photograph as closely as possible, I’d use:
Biscuit + almond crust → vanilla lemon cheesecake → thick blueberry compote → blueberry swirl → fresh blueberries → toasted almond/biscuit crumble.
The lemon is especially useful: it cuts through the richness of the cream cheese and makes the blueberry flavor much brighter.
Approximate layer structure
Top: 🫐 fresh blueberries + nut/biscuit crumble
Layer 3: blueberry sauce/swirl
Layer 2: creamy vanilla cheesecake
Bottom: buttery biscuit + almond crust
This should give you the creamy, marbled blueberry cheesecake appearance shown in the uploaded image.

With years of experience in restaurant research and local SEO, Sara creates accurate, user-friendly guides that work for both people and search engines. Her goal is to help users go from search results to their nearest restaurant or menu choice with as few clicks as possible.
- Grandma’s Cream Puffs – Light, Crisp & Creamy - October 17, 2026
- Easy Crockpot Creamy Garlic Parmesan Chicken - October 17, 2026
- Garlic Herb Roasted Potatoes - October 17, 2026