Yield: 10–12 pieces
Dish: approximately 8 × 10 inch / 20 × 25 cm rectangular dish
Preparation: 30–40 minutes
Chilling: minimum 6 hours, preferably overnight
Oven: No oven
Ingredients
1. Biscuit layers
350–400 g plain tea biscuits, Marie biscuits or Petit Beurre
100–120 ml cold milk
1 tsp vanilla extract
1 tbsp sugar — optional
Best biscuit choices: Marie/tea biscuits give the closest traditional soft-cake texture. Digestive biscuits make the dessert more buttery and slightly heavier.
2. Cream filling
500 ml cold whipping cream, 30–35% fat or higher
200 g cream cheese, softened
100–120 g powdered sugar
1½ tsp vanilla extract
2 tbsp milk powder — optional, but helps give a richer Pakistani-style bakery cream
2 tbsp sweetened condensed milk — optional
1 small pinch salt
The cream must be very cold before whipping. Cold cream is important for getting a thick, stable filling. Similar no-bake recipes use cold cream and avoid over-whipping because over-whipped cream can become grainy.
A
Awesome Food
3. Nut mixture
For the appearance in your photograph, I would use a combination of almonds and walnuts.
60 g almonds
40 g walnuts
30 g cashews
20 g pistachios — optional
1 tbsp sugar — optional
¼ tsp salt
Nut options
You don’t need to use all four.
For a classic flavor:
Almonds + walnuts
For a richer Pakistani-style version:
Almonds + walnuts + pistachios
For a milder flavor:
Almonds + cashews
For the closest visual topping:
Mostly almonds/walnuts, chopped into a mixture of fine crumbs and small chunks.
The important thing is not to grind everything into powder. The photograph has both tiny crumbs and larger nut pieces.
Toasting the nuts
This makes a big difference.
Put the almonds, walnuts and cashews in a dry frying pan.
Toast over low-medium heat for about 4–6 minutes.
Stir continuously.
Stop when they smell nutty and become lightly golden.
Remove immediately from the pan.
Cool completely.
Chop roughly.
Don’t burn the nuts. They continue cooking slightly from residual heat after you remove them.
Reserve approximately 2–3 tablespoons of the chopped nuts for the top.
Step 1 — Make the cream
Put the cold whipping cream into a large chilled bowl.
Beat on medium-high speed until it starts becoming thick.
Add:
powdered sugar
vanilla
milk powder
salt
Continue beating until you have medium-stiff peaks.
Don’t keep beating unnecessarily.
Now add the softened cream cheese.
Beat on low speed just until incorporated.
Add the condensed milk if using it.
The final mixture should be:
thick + smooth + spreadable + able to hold its shape.
If the cream is too loose, refrigerate it for 15–20 minutes and beat briefly again.
Step 2 — Prepare the milk
Mix:
100–120 ml cold milk
1 tsp vanilla
1 tbsp sugar, if desired
Put this into a shallow bowl.
You don’t want the biscuits soaking in liquid.
Step 3 — First biscuit layer
Spread 2–3 tablespoons of cream over the bottom of your dish.
This prevents the biscuits from sliding.
Dip each biscuit into the milk for approximately 1 second per side.
Remove immediately.
Arrange the biscuits tightly in the dish.
If necessary, break biscuits to fill the corners.
Do not soak them.
They will absorb additional moisture from the cream while refrigerated. Brief dipping is also recommended in other no-bake biscuit cakes because over-soaking makes the biscuits collapse.
M
Magical Kitchen Desserts
+1
Step 4 — First cream layer
Spread approximately ⅓ of your cream mixture over the biscuits.
Smooth it with a spatula.
Don’t press too hard.
Step 5 — Add nuts
Sprinkle approximately:
2–3 tbsp chopped toasted nuts
over the cream.
You can also add a small amount of crushed biscuit.
Step 6 — Second biscuit layer
Repeat:
Milk → biscuits → cream → nuts
For a dessert like the photograph, I recommend 3 biscuit layers and 3 cream layers.
So the structure becomes:
NUT TOPPING
────────────────────────
CREAM
────────────────────────
BISCUITS
────────────────────────
CREAM + NUTS
────────────────────────
BISCUITS
────────────────────────
CREAM + NUTS
────────────────────────
BISCUITS
────────────────────────
THIN CREAM
────────────────────────
DISH
Step 7 — Final cream layer
Put the remaining cream on top.
Spread it fairly thickly.
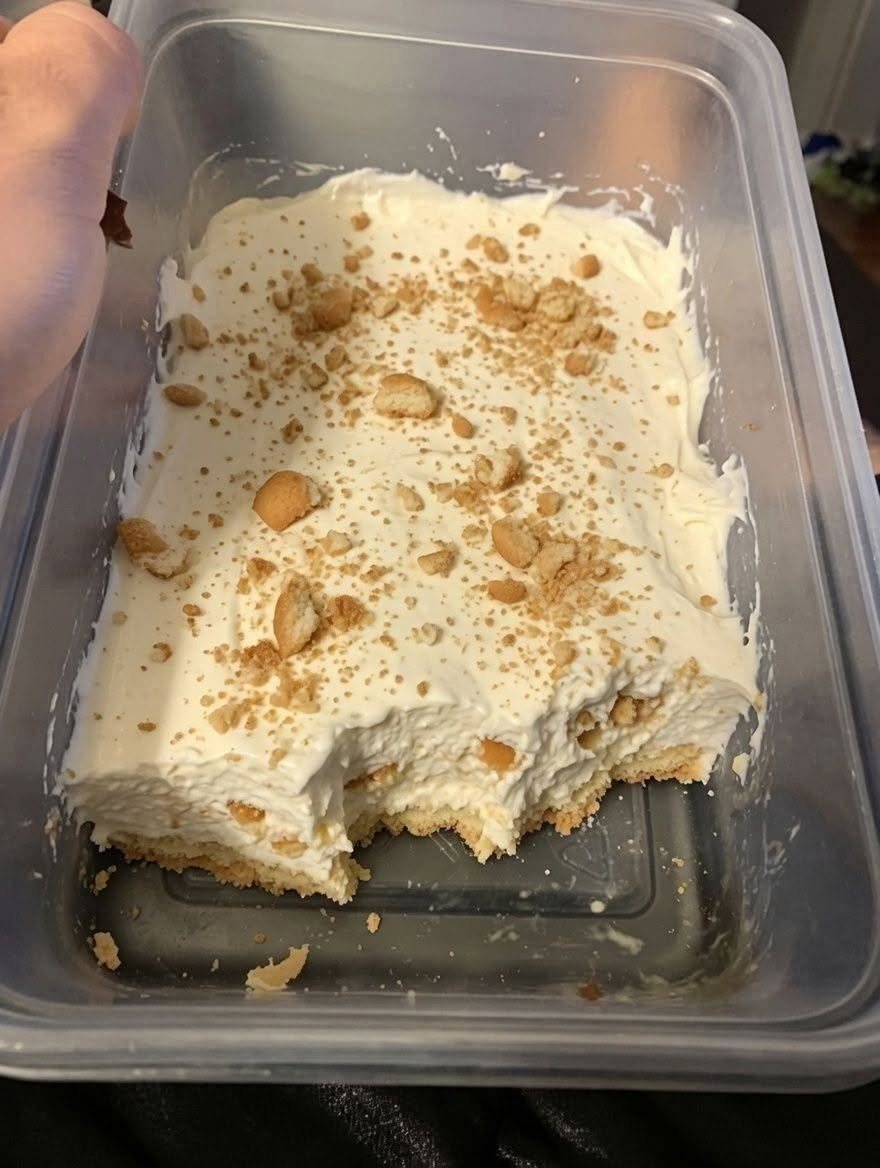
For the look in your picture, don’t make the top perfectly smooth.
Use the back of a spoon or spatula to create gentle waves and swirls.
That’s what gives it the homemade appearance visible in the photograph.
Step 8 — Make the topping
Mix together:
2 tbsp finely crushed almonds
1 tbsp chopped almonds
1 tbsp crushed walnuts
1 tbsp crushed cashews
1 tbsp crushed biscuit
Then scatter it over the cream.
Don’t distribute it completely evenly.
A mixture of fine crumbs + larger pieces gives the appearance in your photograph.
You can also add a few whole/half almond pieces.
Step 9 — Refrigerate
Cover the dish.
Refrigerate for:
minimum: 6 hours
best: overnight, 8–12 hours
This is important.
The biscuits need time to absorb moisture from the cream and become soft and cake-like. That’s the basic principle behind icebox/no-bake biscuit cakes.
A
Awesome Food
+1
Step 10 — Cutting
Take the dessert from the refrigerator.
For clean slices:
Use a sharp knife.
Dip the knife in hot water.
Wipe it dry.
Cut.
Repeat between slices.
Don’t leave the dessert at room temperature for a long time before cutting.
If you want the exact look of the photo
I’d make this particular version:
Cream
500 ml whipping cream
200 g cream cheese
100 g powdered sugar
1½ tsp vanilla
2 tbsp milk powder
Biscuits
375 g Marie/tea biscuits
Nuts
70 g almonds
40 g walnuts
20 g cashews
Topping
30 g finely crushed almonds
15 g walnuts
15 g biscuit crumbs
This gives you a very thick white cream layer, relatively thin biscuit layers and lots of visible nut crumbs—the proportions that visually resemble your photograph.
Complete Nut Information
Almonds
Flavor: mildly sweet, buttery
Texture: crunchy
Best use: topping and between layers
Almonds are probably the most useful nut for this dessert because they retain some crunch after refrigeration.
Walnuts
Flavor: deeper, slightly earthy
Texture: softer than almonds
Best use: mixed into the filling and topping
Don’t use too much walnut if you don’t want bitterness.
Cashews
Flavor: sweet, creamy
Texture: rich and crunchy
Best use: filling and topping
Cashews make the dessert taste richer.
Pistachios
Flavor: sweet, distinctive
Color: attractive green
Best use: decoration
They aren’t essential, but a little pistachio on top looks excellent.
Hazelnuts
Can replace some of the almonds/walnuts. They give a stronger roasted flavor.
Peanut
Technically a legume rather than a tree nut. You can use roasted peanuts, but they’ll give the dessert a much more peanut-forward taste.
Nut Allergy Information
If you’re serving this to other people, don’t assume that removing the visible nuts makes it nut-free.
The following ingredients can contain or be exposed to nuts:
biscuits/cookies
chocolate
cream fillings
packaged toppings
condensed milk products
bakery ingredients
Check the package for statements such as:
“Contains almonds/walnuts/cashews”
or
“May contain traces of tree nuts/peanuts.”
For someone with a serious allergy, use products specifically suitable for their allergy rather than relying only on ingredient inspection.
Tree nuts vs peanuts
Tree nuts:
almonds, walnuts, cashews, pistachios, hazelnuts, pecans, etc.
Peanut:
a legume, not a tree nut.
Someone can be allergic to one without necessarily being allergic to the other.
Nut-free version
If you want the same dessert without nuts:
Replace the nut mixture with:
crushed biscuits
toasted coconut
white chocolate shavings
caramelized biscuit crumbs
For the topping, use approximately:
50 g crushed biscuits + 20 g toasted coconut.
This will preserve the crunchy topping without nuts.
Chocolate version
Add:
2 tbsp cocoa powder to the cream
50–75 g melted and cooled chocolate
chocolate biscuit crumbs for topping
Or make alternating layers of vanilla and chocolate cream.
Coffee version
Dissolve:
1½ tsp instant coffee
in 120 ml warm milk
Cool completely.
Use this instead of plain milk for dipping the biscuits.
Coffee-based versions of no-bake biscuit cakes commonly use briefly dipped biscuits and chilled whipped cream layers.
H
Hello, Sunshine
Banana version
Add thin slices of banana between the biscuit and cream layers.
Use immediately after slicing the banana.
For this version, I would reduce the sugar slightly because the banana adds sweetness.
Caramel version
Add:
3–4 tbsp caramel sauce
½ tsp sea salt
Drizzle a small amount between the layers and over the final cream.
Don’t add too much liquid caramel or the cake can become loose.
Frequently Asked Questions
Q: Can I make this without cream cheese?
Yes.
Use:
600 ml whipping cream
100–120 g powdered sugar
1½ tsp vanilla
2 tbsp milk powder
The result will be lighter and more like whipped cream.
Q: Can I use Dream Whip or another powdered whipping cream?
Yes. It can be used, especially where liquid whipping cream is difficult to find. Some regional no-bake biscuit recipes specifically use powdered whipping cream and milk.
P
Puck Arabia
Follow the package’s liquid-to-powder ratio rather than automatically substituting equal volumes.
Q: Can I use fresh cream instead of whipping cream?
Only if it has enough fat to whip properly.
A low-fat cooking/fresh cream may remain too liquid.
For this dessert, whipping cream is safer.
Q: Why is my cream runny?
Possible reasons:
Q: Can I use Dream Whip or another powdered whipping cream?
Yes. It can be used, especially where liquid whipping cream is difficult to find. Some regional no-bake biscuit recipes specifically use powdered whipping cream and milk.
Q: Can I use fresh cream instead of whipping cream?
cream wasn’t cold enough
cream has insufficient fat
cream was under-whipped
too much liquid was added
cream cheese was too warm
dessert hasn’t chilled long enough
Refrigerate it before assembly and use cold ingredients.
Q: Why did my cream become grainy?
You probably over-whipped it.
Stop beating as soon as you reach the desired consistency.
Q: Why are my biscuits completely soggy?
You soaked them too long.
Dip them very briefly.
The cream will soften them during refrigeration.
Q: Can I skip dipping the biscuits?
Yes.
For a firmer dessert, you can layer the biscuits dry. They will still soften from the cream overnight.
Q: Can I use Digestive biscuits?
Absolutely.
They give a more buttery, slightly crumbly result.
For the photograph’s appearance, plain tea/Marie/Petit Beurre-style biscuits would be my starting point.
Q: Can I use Graham crackers?
Yes. They’re particularly good for an American-style icebox cake.
Q: How long does it last?
Keep it covered in the refrigerator and ideally consume it within 2–3 days for the best texture and freshness.
Q: Can I freeze it?
Yes, but the texture of the cream can change after freezing and thawing.
For this particular dessert, refrigeration is preferable.
Q: Can I make it one day ahead?
Yes—this is actually ideal.
Making it the night before gives the biscuits time to soften and the cream time to stabilize.
Q: Why does it look better the next day?
Because the biscuits absorb moisture from the cream, creating a unified, soft cake-like texture. This is one of the defining characteristics of icebox/no-bake biscuit desserts.
A
Awesome Food
Q: Can I use condensed milk?
Yes, but reduce the powdered sugar.
For example:
500 ml whipping cream
200 g cream cheese
60–80 g powdered sugar
2–3 tbsp condensed milk
vanilla
This produces a sweeter, richer cream.
Q: Does the recipe require gelatin?
No.
The cream cheese + properly whipped cream + refrigeration are sufficient for this style.
If you need extremely firm slices for transport, a small amount of gelatin can be incorporated, but it isn’t necessary for the home version.
Q: How do I make it less sweet?
Use:
unsweetened whipping cream
70–80 g powdered sugar
unsweetened/plain biscuits
no condensed milk
The nuts will provide a nice contrast.
Q: How do I make it more bakery-style?
Use:
500 ml whipping cream + 200 g cream cheese + milk powder + vanilla, and let it chill overnight.
The milk powder gives the cream a richer dairy flavor without adding much liquid.
My recommended final formula
For the dessert in your photograph, I’d use:
375 g Marie/tea biscuits
500 ml whipping cream
200 g cream cheese
100 g powdered sugar
2 tbsp milk powder
1½ tsp vanilla
70 g almonds
40 g walnuts
20 g cashews
100–120 ml milk for dipping
Make 3 biscuit layers + 3 cream layers, scatter toasted nuts between the layers, finish with a thick cream layer and a mixture of fine nut crumbs and larger nut pieces, then refrigerate overnight.
That should give you the closest homemade version of the dessert shown in your photo.

With years of experience in restaurant research and local SEO, Sara creates accurate, user-friendly guides that work for both people and search engines. Her goal is to help users go from search results to their nearest restaurant or menu choice with as few clicks as possible.
- Grandma’s Cream Puffs – Light, Crisp & Creamy - October 17, 2026
- Easy Crockpot Creamy Garlic Parmesan Chicken - October 17, 2026
- Garlic Herb Roasted Potatoes - October 17, 2026