No-Bake, Two-Layer Dessert Inspired by Your Photo
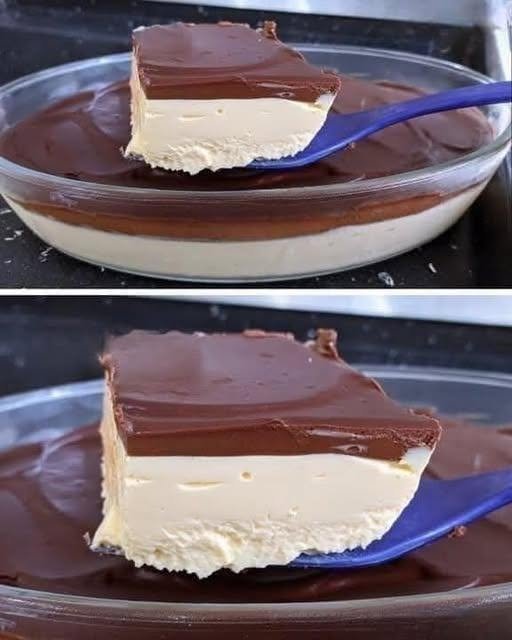
The dessert in your picture appears to be a chilled no-bake creamy dessert with a thick white vanilla/condensed-milk layer and a smooth chocolate topping. It has a soft, cheesecake-like consistency but doesn’t require baking.
Below is a reliable homemade version designed to give you the same clean layers, creamy white center, and glossy chocolate top.
Recipe at a Glance
Yield: 8–10 servings
Dish: 20–22 cm / 8–9 inch shallow glass dish
Prep: 25 minutes
Chilling: 5–6 hours
Best: Overnight
Difficulty: Easy
Ingredients
White Cream Layer
1 can (395 g / 14 oz) sweetened condensed milk
400 ml / 1⅔ cups heavy cream or whipping cream
200 g / 7 oz cream cheese, softened
1 tsp vanilla extract
Pinch of salt
10 g / 2½ tsp unflavored powdered gelatin
60 ml / ¼ cup cold water
Optional for a firmer, more sliceable layer
2 tbsp powdered milk
Chocolate Topping
200 g / 7 oz semi-sweet or dark chocolate, finely chopped
200 ml / about ¾ cup + 1 tbsp heavy cream
1 tbsp unsalted butter
1 tsp vanilla extract, optional
Tiny pinch of salt
For the appearance in your photograph, use semi-sweet chocolate around 50–60% cocoa. It produces a dark, glossy topping without becoming excessively bitter.
FULL STEP-BY-STEP RECIPE
Step 1 — Prepare the gelatin
Put:
10 g gelatin + 60 ml cold water
into a small bowl.
Stir and leave it for about 5 minutes.
The gelatin will absorb the water and become a thick sponge-like mixture.
Then dissolve it
Heat very gently in the microwave for about 10–15 seconds, or place the bowl over warm water.
Stir until completely liquid.
Do not boil the gelatin.
Set aside.
Step 2 — Make the white cream
Place into a blender:
395 g condensed milk
200 g cream cheese
400 ml heavy cream
Vanilla
Pinch of salt
Blend for approximately 30–45 seconds, just until smooth.
Don’t continuously blend for several minutes because you don’t want to unnecessarily whip the cream.
Step 3 — Add gelatin
With the blender running at low speed, slowly pour in the dissolved gelatin.
Blend for another 10–15 seconds.
Stop immediately once incorporated.
The mixture should be:
smooth + thick + completely lump-free.
Step 4 — Pour into the dish
Pour the white mixture into your glass serving dish.
Gently tap the dish against the counter a few times to remove large air bubbles.
Use a spatula to make the surface completely level.
Important
The white layer should occupy approximately ⅔ of the final dessert’s height.
Refrigerate for at least 1½–2 hours, or until the surface is sufficiently firm to support the chocolate layer.
Step 5 — Make the chocolate topping
Put the chopped chocolate into a heatproof bowl.
Heat the heavy cream until it is hot and steaming but not boiling.
Pour the hot cream over the chocolate.
Leave untouched for 2 minutes.
Then slowly stir from the center outward.
Add:
1 tbsp butter
Pinch of salt
Vanilla, if using
Stir until completely smooth and glossy.
This is essentially a chocolate ganache.
Step 6 — Cool the ganache
This step is VERY important.
Do not pour freshly hot ganache onto the white layer.
Allow it to cool until it is:
warm/room temperature but still pourable.
If it’s too hot, it can melt the surface of the white layer and cause the chocolate and cream layers to mix.
Step 7 — Add the chocolate layer
Take the chilled white dessert from the refrigerator.
Pour the cooled ganache gently over the surface.
Don’t pour it aggressively into one spot.
Instead, pour slowly and move around the dish.
Use the back of a spoon or offset spatula to spread it evenly.
You want a chocolate layer approximately:
5–8 mm / ¼ inch thick.
That gives the appearance shown in your photograph.
Step 8 — Final chilling
Cover the dish without touching the chocolate surface.
Refrigerate for:
Minimum:
3 hours
Better:
5–6 hours
Best texture:
Overnight
The gelatin will finish setting and the chocolate will become firm enough to cut while remaining creamy.
Step 9 — Serving
Take the dessert from the refrigerator.
For neat slices:
Dip a sharp knife in hot water.
Wipe it dry.
Cut straight down.
Clean the knife.
Repeat for every slice.
This gives you the clean white-and-chocolate layers seen in the photograph.
How to Make It Look EXACTLY Like the Photo
For that thick, smooth appearance:
White layer
Use full-fat cream cheese + full-fat heavy cream.
Chocolate layer
Use 50–60% dark/semi-sweet chocolate.
Don’t make the ganache too thin.
Use approximately:
200 g chocolate : 200 ml cream
Chill properly.
The dessert needs enough time for the gelatin to stabilize.
Don’t over-whip.
The photograph shows a dense, smooth white layer rather than a fluffy whipped-cream mousse.
NUT & ALLERGEN INFORMATION
Nuts
The basic recipe contains:
No peanuts and no tree nuts.
However, chocolate products can have warnings such as:
“May contain nuts”
“Made on equipment that processes nuts”
“May contain traces of peanuts”
If preparing this for someone with a serious nut allergy, use chocolate and other ingredients specifically labeled according to their allergy requirements.
Possible tree nuts to watch for
Some chocolate products may contain or be processed with:
Almond
Hazelnut
Pistachio
Cashew
Walnut
So check the actual chocolate package, rather than assuming all chocolate is nut-free.
Other Allergens
Milk
Contains substantial amounts of dairy from:
Cream cheese
Heavy cream
Butter
Chocolate, depending on type
Gluten
The basic recipe contains no flour or biscuits, so the ingredients themselves can be gluten-free.
However, check chocolate and other packaged ingredients for cross-contact.
Egg
No eggs are required.
Soy
Chocolate frequently contains soy lecithin.
Check the chocolate label if soy is an allergy concern.
APPROXIMATE NUTRITION
Nutrition varies by brand and chocolate percentage.
Using the recipe above and cutting it into 10 servings, each serving is approximately:
Nutrient Approx. per serving
Calories 430–470 kcal
Protein 6–8 g
Carbohydrates 38–43 g
Total fat 28–32 g
Saturated fat 18–21 g
Sugar 32–37 g
Fiber 1–2 g
Sodium 150–220 mg
These are estimates, not laboratory-tested values. The exact numbers depend heavily on the brands of condensed milk, cream cheese, cream and chocolate.
Want It Less Sweet?
The condensed milk makes the white layer quite sweet.
For a less-sweet version:
Use 300–330 g condensed milk
Use 70% dark chocolate for the topping
Add a small pinch of salt to both layers
Don’t simply remove a large amount of condensed milk without adjusting the recipe because it also contributes to the texture.
Want a More Chocolatey Version?
Add:
1½ tbsp unsweetened cocoa powder
to the white mixture.
Blend thoroughly.
Or make the chocolate topping thicker:
250 g chocolate
200 ml cream
This produces a more substantial chocolate layer similar to a chocolate ganache cake topping.
Dairy-Free Version
Use:
Dairy-free condensed milk
Dairy-free cream cheese
Coconut or other dairy-free whipping cream
Dairy-free chocolate
Dairy-free butter alternative
The gelatin can remain if you are not making the dessert vegetarian.
For a vegetarian version, replace gelatin with a suitable vegetarian setting agent according to its package instructions.
Frequently Asked Questions
Can I make it without gelatin?
Yes, but the white layer will be considerably softer.
You can make it as a mousse and serve it in individual glasses, but gelatin gives the firm slice shown in the picture.
Can I use whipped cream instead of gelatin?
You can, but the result will be more like a mousse and less like the firm dessert shown.
Can I use mascarpone instead of cream cheese?
Yes.
Use 200 g mascarpone in place of the cream cheese.
The result will be richer and more luxurious.
Can I use milk chocolate?
Yes, but the final dessert will be much sweeter.
I’d reduce the condensed milk slightly if using very sweet milk chocolate.
Can I use white chocolate for the top?
Yes, but then you’ll have a white-on-white dessert.
For the photograph, dark/semi-sweet chocolate is much better.
Why did my chocolate layer melt the white layer?
Most likely the ganache was too hot.
Solution: Let the ganache cool substantially before putting it onto the chilled white layer.
Why did my white layer not set?
Possible causes:
Gelatin wasn’t properly dissolved.
Too little gelatin was used.
The gelatin was overheated.
The dessert wasn’t chilled long enough.
The measurements were significantly changed.
Give it at least 5–6 hours, preferably overnight, before deciding it hasn’t set.
Can I put the chocolate on immediately?
No.
The white layer should first become sufficiently firm.
Otherwise the chocolate can sink into it and you’ll lose the distinct two-layer appearance.
Can I make it the day before?
Yes—this is actually ideal.
Make it the night before, cover it and refrigerate overnight.
The layers will become firmer and the flavor will develop.
How long does it last in the refrigerator?
For best quality, consume within approximately 3–4 days, kept continuously refrigerated and covered.
Because this contains dairy, don’t leave it sitting at room temperature for extended periods.
Can I freeze it?
You can freeze it, but I don’t recommend it for the best texture.
Cream cheese/cream-based mixtures can change texture after thawing, and the ganache can lose some of its smoothness.
Can I make individual portions?
Absolutely.
Pour the white mixture into:
Small glasses
Dessert cups
Ramekins
Chill, then add a thin ganache layer.
This is especially convenient for parties because you don’t have to cut the dessert.
Optional Biscuit Base
The photograph appears to have a very subtle pale base beneath the white cream. If you want a more cheesecake-like bottom, add:
200 g crushed digestive biscuits
80 g melted butter
Mix and press firmly into the bottom of the dish.
Chill for 20–30 minutes before adding the white layer.
This gives you:
Biscuit base → vanilla cream → chocolate ganache
and makes the dessert easier to lift and serve.
Best Version
For the closest overall result, I recommend:
Optional thin biscuit base
Thick condensed-milk/cream-cheese vanilla layer Smooth semi-sweet chocolate ganache
Overnight refrigeration
The key to getting the beautiful clean slice shown in your photo is not a complicated

With years of experience in restaurant research and local SEO, Sara creates accurate, user-friendly guides that work for both people and search engines. Her goal is to help users go from search results to their nearest restaurant or menu choice with as few clicks as possible.
- Grandma’s Cream Puffs – Light, Crisp & Creamy - October 17, 2026
- Easy Crockpot Creamy Garlic Parmesan Chicken - October 17, 2026
- Garlic Herb Roasted Potatoes - October 17, 2026