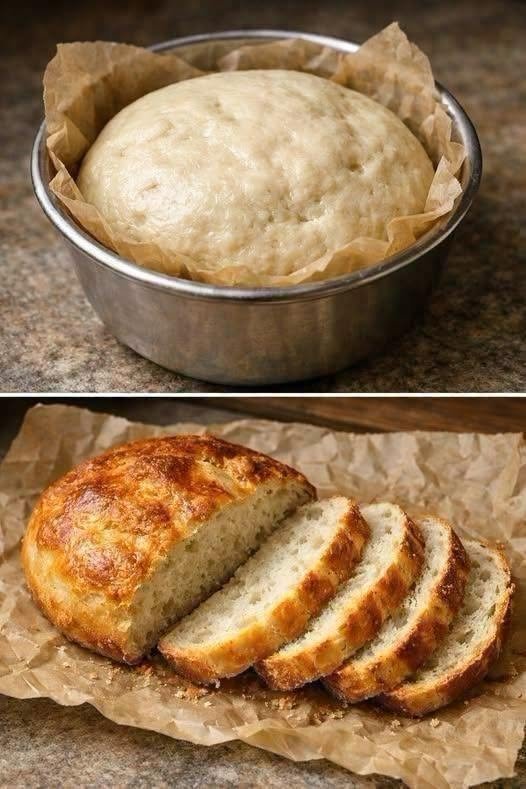
The photo shows a small round, crusty homemade loaf with a soft, airy center. The exact original recipe isn’t visible in the image, so the recipe below is a reliable version designed to produce a very similar loaf.
It uses simple pantry ingredients and can be made without a stand mixer.
Ingredients
For 1 small round loaf
2½ cups (315 g) all-purpose flour
1 tsp instant yeast — about 3 g
1 tsp salt — about 5–6 g
1 tsp sugar or honey — optional, helps browning
1 cup (240 ml) warm water, approximately 38–43°C / 100–110°F
1 tbsp olive oil or melted butter — optional, for a softer crumb
Optional additions
1 tbsp sesame seeds
1 tbsp sunflower seeds
1–2 tbsp pumpkin seeds
2 tbsp chopped walnuts
1 tbsp flaxseed
1 tbsp chia seeds
½ tsp dried rosemary
½ tsp dried oregano
1–2 tbsp grated Parmesan
Step-by-Step Instructions
1. Activate/check the yeast
If using instant yeast, you can mix it directly into the flour.
If using active dry yeast, mix the yeast and sugar/honey with the warm water and let it stand for 5–10 minutes.
You should see some foam on the surface.
Don’t use very hot water—it can damage the yeast.
2. Make the dough
Add the flour and salt to a large bowl.
Mix in the yeast mixture and approximately ¾ of the water.
Stir with a wooden spoon or your hand.
Gradually add the remaining water until you have a soft, slightly sticky dough.
If using olive oil or butter, mix it in now.
The dough shouldn’t be dry or stiff.
3. Knead
Transfer the dough to a lightly floured surface.
Knead for approximately 7–10 minutes.
You want the dough to become:
Smooth
Elastic
Soft
Slightly tacky but not excessively sticky
Alternatively, use a stand mixer with a dough hook for about 5–6 minutes on low/medium-low speed.
First Rise
Place the dough in a lightly oiled bowl.
Cover with plastic wrap, a lid, or a clean damp towel.
Leave it somewhere warm for approximately 1–1½ hours, or until it has roughly doubled in size.
Don’t rely only on the clock.
Temperature affects fermentation. If your kitchen is cool, it may take closer to 2 hours.
Shape the Loaf
Once doubled:
Gently press the dough down to release excess gas.
Transfer it to your work surface.
Fold the edges toward the center.
Turn it over.
Gently rotate and pull the dough toward yourself to create surface tension.
Shape into a round boule.
Don’t aggressively knead it at this stage.
Prepare the Baking Container
The loaf in the photograph appears to be proofed in a small round metal baking container.
You can use:
Small cake tin
Round casserole dish
Dutch oven
Oven-safe metal bowl
Loaf pan for a different shape
Line the container with parchment paper.
Lightly flour the parchment if desired.
Second Rise
Place the shaped dough into the prepared container.
Cover loosely and let it rise for 30–60 minutes.
It should look noticeably puffy.
Don’t let it rise until it completely collapses or becomes extremely loose.
Score the Bread
Right before baking, make one or two shallow cuts across the top using:
A sharp knife
Bread lame
Razor blade
This gives the expanding bread somewhere to release steam and also creates the attractive crust shown in the photograph.
Baking
Standard oven method
Preheat your oven to:
220°C / 425°F
Bake for approximately:
25–30 minutes
The crust should become deep golden brown.
For an especially crisp crust, place a small oven-safe dish of hot water in the oven during the first 10–15 minutes.
Dutch oven method
For an even crustier loaf:
Preheat Dutch oven to 230°C / 450°F.
Place the dough inside.
Cover with the lid.
Bake 20 minutes covered.
Remove the lid.
Bake another 10–15 minutes until deeply golden.
How to Know It’s Done
The loaf should be:
Deep golden brown
Firm underneath
Light for its size
Hollow-sounding when tapped
If using a thermometer, the center should generally reach around 93–99°C (200–210°F).
Cooling — Very Important
Remove the bread from the pan and place it on a wire rack.
Allow it to cool for at least 45–60 minutes before slicing.
Cutting immediately can flatten the dough, distribute them across it, fold it several times, and then make the interior appear gummy because the crumb is still setting.
Nuts & Seeds Guide
If you want the loaf to contain nuts, don’t overload the dough because too many additions can interfere with its rise.
Excellent combinations
Walnut bread
½ cup chopped walnuts
Seeded bread
2 tbsp sunflower seeds
2 tbsp pumpkin seeds
1 tbsp sesame seeds
Walnut & raisin
⅓ cup walnuts
⅓ cup raisins
Nutty breakfast bread
¼ cup walnuts
¼ cup almonds
2 tbsp pumpkin seeds
Toast nuts and seeds lightly before adding them for a stronger flavor. Let them cool completely first.
When to add them
Add nuts/seeds during the last few minutes of kneading, or flatten the dough, distribute them across it, fold it several times, and then shape.
Nut Allergy / Nut-Free Version
You can completely omit nuts.
Good replacements include:
Sunflower seeds
Pumpkin seeds
Sesame seeds
Flaxseed
Chia seeds
If preparing the bread for someone with a serious nut allergy, check packaged ingredients and avoid cross-contamination from shared equipment.
Bread Recipe Q&A
Why didn’t my bread rise?
Possible causes include:
Yeast was old or inactive.
Water was too hot.
Room was too cold.
Too much flour was added.
The dough wasn’t given enough time.
Give fermentation more time rather than automatically adding more yeast.
Why is my bread dense?
Usually the dough either didn’t ferment sufficiently or too much flour was added.
The dough should feel soft rather than stiff.
Why is my bread flat?
It may have been over-proofed. If the dough rises dramatically and then collapses, it has likely fermented too far.
Can I use whole-wheat flour?
Yes.
Start by replacing about 25–50% of the white flour with whole-wheat flour.
Whole-wheat flour absorbs more water, so you may need an additional 1–3 tbsp water.
Using 100% whole wheat will produce a denser loaf.
Can I use bread flour?
Absolutely. Bread flour generally produces a more elastic dough and chewier crumb.
Use the same starting amount, but adjust the water slightly if necessary.
Can I make it without sugar?
Yes. Sugar isn’t essential for the bread to work.
The yeast can obtain fermentable sugars from the flour.
Can I make it without oil?
Yes. Simply omit it.
The loaf will generally have a slightly leaner, chewier texture.
Can I use milk instead of water?
Yes. You can replace some or all of the water with milk.
Milk generally gives the bread a softer crumb and more browned crust.
Can I make the dough the night before?
Yes—and this can improve flavor.
After mixing/kneading, cover the dough and refrigerate it for approximately 8–18 hours.
The next day:
Remove it from the refrigerator.
Allow it to warm somewhat.
Shape it.
Let it rise until puffy.
Bake.
Can I freeze the finished bread?
Yes.
Cool it completely, wrap it tightly, and freeze for up to approximately 2–3 months for best quality.
Thaw at room temperature and reheat briefly in the oven for a fresh crust.
How should I store it?
For the best crust, keep the cooled loaf at room temperature in a bread bag or loosely wrapped in a clean towel.
Avoid refrigerating bread unless necessary; refrigeration can make the crumb stale more quickly.
Approximate Nutrition
For the basic loaf without nuts, divided into 8 slices:
Calories: ~155–170 per slice
Protein: ~5–6 g
Carbohydrates: ~30–32 g
Fat: ~1–2 g
Fiber: ~1–2 g
These are estimates and vary according to the flour, slice size, oil, and other ingredients.
With walnuts
Adding ½ cup walnuts to the whole loaf increases the loaf’s calories and healthy unsaturated fat substantially, while also adding protein, fiber, magnesium, and other nutrients.
For a loaf closest to the photograph
I’d use:
315 g all-purpose flour + 1 tsp instant yeast + 1 tsp salt + 1 tsp honey + 240 ml warm water + 1 tbsp olive oil.
Knead → rise until doubled → shape into a round → second rise → score → bake at 220°C/425°F for about 25–30 minutes.

With years of experience in restaurant research and local SEO, Sara creates accurate, user-friendly guides that work for both people and search engines. Her goal is to help users go from search results to their nearest restaurant or menu choice with as few clicks as possible.
- Grandma’s Cream Puffs – Light, Crisp & Creamy - October 17, 2026
- Easy Crockpot Creamy Garlic Parmesan Chicken - October 17, 2026
- Garlic Herb Roasted Potatoes - October 17, 2026