Yield: 1 large round loaf
Servings: 8–10 slices
Prep: 10–15 minutes
First rise: 8–18 hours
Second rise: 30–60 minutes
Bake: about 45–50 minutes
Difficulty: Easy
Style: Crusty outside, soft and chewy inside
Ingredients
Main dough
Ingredient Metric Cups/spoons
All-purpose flour 375 g 3 cups
Warm water 355 g/ml 1½ cups
Active dry yeast 3 g 1 tsp
Salt 10–12 g 1¾–2 tsp
Olive oil 1 tbsp optional
The basic four-ingredient combination of flour, yeast, salt and water is widely used for no-knead bread.
R
Red Star® Yeast
+1
Optional ingredients
For a richer or flavored loaf, you can add:
1 tsp sugar or honey — slightly more browning
1 tbsp olive oil — softer crust
1 tsp garlic powder
1–2 tsp dried rosemary
½ tsp black pepper
2 tbsp sesame seeds
2 tbsp sunflower seeds
2 tbsp pumpkin seeds
50–75 g grated cheese
2–3 tbsp chopped olives
For the bread in your photo, I recommend keeping it plain.
FULL STEP-BY-STEP METHOD
1. Prepare the yeast
Place 1½ cups / 355 ml warm water in a large bowl.
The water should feel comfortably warm, not hot—around 105–115°F / 40–46°C is suitable for active dry yeast.
Add:
1 tsp active dry yeast
1 tsp honey or sugar, optional
Stir and leave for 5 minutes.
If your yeast becomes slightly foamy, that’s a good sign.
If using instant yeast, you can simply mix it directly with the flour.
2. Mix the dry ingredients
In another bowl, combine:
375 g / 3 cups flour
10–12 g salt
Mix well.
3. Make the dough
Add the flour mixture to the water.
Mix with a wooden spoon, spatula or your hands until all the flour is hydrated.
The dough should look:
sticky
rough
shaggy
slightly wet
Do not add lots of flour just because the dough is sticky.
A wet dough is normal for this style of bread. Similar no-knead formulas intentionally produce a sticky, shaggy dough.
R
Red Star® Yeast
+1
4. First rise — the important part
Cover the bowl tightly with plastic wrap, a lid, or a damp kitchen towel.
Leave it at room temperature for:
Best flavor:
8–18 hours
Overnight is ideal.
During this time the dough will:
expand
develop bubbles
become softer
develop gluten
develop more flavor
The long fermentation is what makes this bread taste much more sophisticated than the tiny ingredient list suggests.
R
Red Star® Yeast
+1
Don’t judge by the clock alone
The dough is ready when it has approximately doubled in volume and looks bubbly.
5. Shape the loaf
Generously flour your work surface.
Scrape the dough out of the bowl.
It will be sticky—this is normal.
Dust the top with a little flour.
Instead of kneading, gently:
Stretch one side toward the center.
Fold it over.
Turn the dough.
Repeat 3–4 times.
Turn it seam-side down.
Gently form it into a round ball.
Don’t aggressively knead it.
6. Second rise
Place the dough on parchment paper.
Cover loosely with a clean towel.
Let it rest for approximately 30–60 minutes.
Meanwhile, start heating your oven.
7. Preheat the Dutch oven
Put a 4–6 quart / approximately 4–5.5 L Dutch oven or heavy oven-safe pot with its lid inside the oven.
Heat to:
450°F / 230°C
Let the empty pot heat for approximately 30 minutes.
A preheated heavy pot helps provide strong oven spring, while its lid traps steam around the dough, producing the characteristic crisp crust.
R
Red Star® Yeast
+1
8. Score the dough
Remove the towel.
Using a very sharp knife or bread lame, make:
one long slash across the top.
You can also make:
a cross
two parallel cuts
a simple decorative pattern
Don’t cut too deeply—roughly 0.5–1 cm is sufficient.
9. Bake
Very carefully remove the extremely hot Dutch oven.
Lift the parchment and dough together and place them into the pot.
Put the lid on.
Covered:
30 minutes at 450°F / 230°C
Then remove the lid.
Uncovered:
Bake another 15–20 minutes.
The loaf should become:
deep golden brown
crisp
beautifully blistered
A comparable established recipe uses 30 minutes covered followed by additional uncovered baking until deeply browned.
L
Le Creuset
10. Check whether it’s done
If you have an instant-read thermometer, aim for approximately:
200–210°F / 93–99°C in the center.
Otherwise, tap the bottom of the loaf.
It should sound hollow rather than dull.
11. VERY IMPORTANT — cool before slicing
Remove the bread from the pot.
Place it on a wire rack.
Wait at least:
1 hour
before cutting.
I know it’s tempting to slice it immediately, but the inside is still setting. Cutting too early can give you a gummy or compressed crumb.
Expected Result
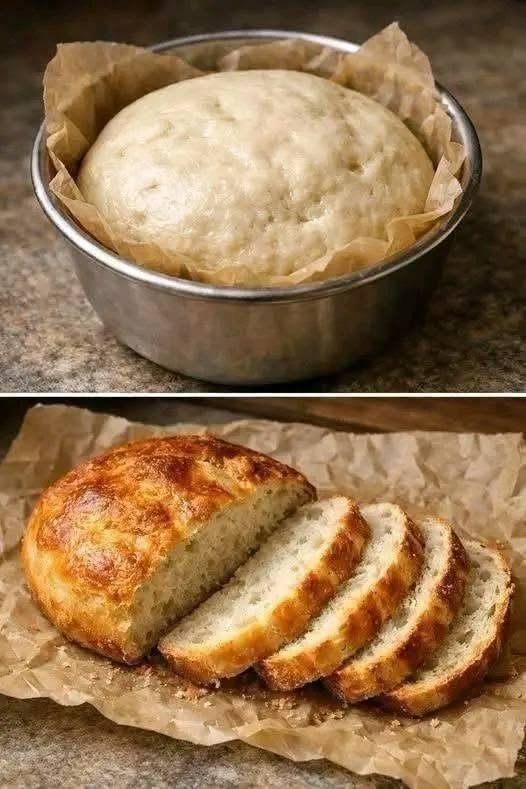
You should get something very close to the bread shown in your second photograph:
Outside:
Golden-brown
Crisp/crackly
Rustic
Inside:
Soft
Moist Chewy
Irregular air pockets
How to serve it
This bread is excellent with:
butter
olive oil
honey
jam
scrambled eggs
omelets
soup
chicken
cheese
sandwiches
avocado
garlic butter
For a simple snack, toast a slice and spread it with butter + honey + a tiny pinch of salt.
Storage
Room temperature
Keep cooled bread in a paper bag or bread box for about 2–3 days for best texture.
Avoid sealing warm bread in plastic because trapped moisture can soften the crust.
Freezing
Slice the cooled loaf.
Place slices in a freezer-safe bag and freeze.
For best quality, use within approximately 2–3 months.
Toast directly from frozen or allow individual slices to thaw.
Nutrition Information
Because nutrition varies according to flour brand, slice size and the exact amount of salt, these are estimated values.
For the basic recipe above, assuming approximately 10 slices:
Nutrition Approx. per slice
Calories ~150–165 kcal
Carbohydrates ~31–33 g
Protein ~4–5 g
Fat ~0.5–1.5 g
Fiber ~1–2 g
Sugars <1 g
Sodium ~350–450 mg
Important: If you add olive oil, cheese, seeds, butter, etc., the calories and fat will increase.
For a more precise nutrition calculation, weighing the actual flour, salt and any added ingredients is preferable.
Recipe Q&A
Q: Can I use all-purpose flour?
Yes. All-purpose flour works very well. Bread flour can give the loaf somewhat more chew and structure. No-knead recipes commonly use either.
B
Belle of the Kitchen
+1
Q: Can I use bread flour?
Yes. Substitute it 1:1 by weight.
You may need a small additional splash of water because different flours absorb water differently.
Q: Can I use instant yeast?
Yes.
Use approximately ¾–1 teaspoon instant yeast for this long-rise recipe.
Q: Can I use fresh yeast?
Yes. Use approximately 9 g fresh yeast in place of 3 g dry yeast.
Q: My dough is extremely sticky. Did I do something wrong?
Probably not.
This is supposed to be a relatively wet dough.
Use wet or lightly floured hands rather than adding large quantities of flour.
Q: My dough didn’t rise.
Possible causes include:
Storage
Freezing
Slice the cooled loaf.
yeast is old/dead
water was too hot
room is very cold
fermentation time was too short
too much salt was added directly to the yeast
Give it more time in a comfortably warm place.
Q: Can I make it without a Dutch oven?
Yes.
Use a heavy oven-safe pot with a lid if available. Some recipes also use other covered oven-safe cookware.
T
THE SIMPLE VEGANISTA
If you don’t have a covered pot, you can bake it on a tray, but the crust and oven spring may be different.
Q: Why do I need to preheat the pot?
The hot pot gives the dough an immediate burst of heat, while the covered environment retains steam. This helps produce the dramatic rise and crisp crust associated with Dutch-oven bread.
D
Dutch Oven Daddy
Q: Why is my bread dense?
Common causes:
Dough didn’t ferment long enough.
Yeast was inactive.
Too much extra flour was added.
Dough was overworked during shaping.
Bread was cut while still hot.
Q: Why did my bread spread instead of becoming round?
The dough may be over-hydrated, over-proofed, or lacking structure.
Next time, use slightly less water and shape the dough more tightly.
Q: Why is the crust too hard?
Bake uncovered for less time, or lower the oven temperature slightly toward the end.
Q: Why isn’t my crust crispy?
Make sure you bake uncovered for the final 15–20 minutes and allow the loaf to cool on a wire rack rather than inside the pot.
Q: Can I make the dough the night before?
That’s actually the recommended method. Mix it in the evening, let it ferment overnight, shape it the next day and bake. Long-rise no-knead formulas commonly use an 8–18 hour fermentation.
R
Red Star® Yeast
Q: Can I add whole-wheat flour?
Yes, but don’t replace all the white flour initially.
Try:
300 g white flour + 75 g whole-wheat flour.
You may need a little additional water.
Q: Can I add seeds?
Absolutely.
Try:
1 tbsp sesame
1 tbsp sunflower
1 tbsp pumpkin
1 tbsp flax
Fold them in after the dough has initially come together.
Q: Can I add cheese and herbs?
Yes. A delicious version is:
50 g cheddar + 1 tsp dried rosemary + ½ tsp garlic powder.
Fold them into the dough before shaping.
My Recommended Version for the Photo
If your goal is to reproduce the exact rustic appearance shown, I’d use:
375 g flour
355 g water
3 g active dry yeast
11 g salt
Then:
8–18 hour rise → gentle shaping → 45-minute second rise → 450°F/230°C preheated Dutch oven → 30 min covered → 15–20 min uncovered → 1 hour cooling.
That combination should give you the large rounded loaf, browned crust and soft sliced interior seen in your pictures.
R
Red Star® Yeast
+1

With years of experience in restaurant research and local SEO, Sara creates accurate, user-friendly guides that work for both people and search engines. Her goal is to help users go from search results to their nearest restaurant or menu choice with as few clicks as possible.
- Creamy Garlic Parmesan Chicken & Broccoli Rice Bowls - September 19, 2026
- Crispy Cheesy Hashbrowns - September 19, 2026
- Crispy Potato Pockets Snack - September 19, 2026