Yield: 8 cups, approximately 8–10 oz each
Prep: 45 minutes
Baking: 25–35 minutes
Chilling: 2–4 hours
Style: Bakery/café dessert cup
Texture: Fudgy brownie + silky custard + caramel + whipped cream + crunchy crumbs
1. WHAT YOU NEED
The finished cup has 5 main components:
Chocolate brownie/cake crumbs
Vanilla-caramel custard
Thick caramel sauce
Chocolate ganache/sauce
Stabilized whipped cream
Then we add brownie crumbs and chocolate chunks on top.
PART 1 — FUDGY CHOCOLATE BROWNIES
Ingredients
½ cup / 113 g unsalted butter
¾ cup / 150 g granulated sugar
½ cup / 100 g brown sugar
2 large eggs
1 tsp vanilla extract
¾ cup / 95 g all-purpose flour
½ cup / 45 g unsweetened cocoa powder
¼ tsp salt
½ cup / 85 g semi-sweet chocolate chips
¼ cup / 60 ml heavy cream
Optional
½ tsp espresso powder
½ cup chopped chocolate chunks
The espresso powder doesn’t make the brownies taste like coffee; it intensifies the chocolate.
Brownie method
Step 1 — Melt
Melt:
butter
chocolate chips
together over low heat.
Stir until smooth.
Don’t boil.
Step 2 — Add sugars
Whisk in:
white sugar
brown sugar
until combined.
Step 3 — Eggs
Add eggs one at a time.
Whisk for approximately 30–45 seconds after each egg.
Add vanilla.
Step 4 — Dry ingredients
Sift together:
flour
cocoa
salt
espresso powder, if using
Fold into the chocolate mixture.
Don’t overmix.
Step 5 — Bake
Spread into a greased or parchment-lined 8 × 8-inch pan.
Bake at:
350°F / 175°C for approximately 25–30 minutes.
For dessert cups, don’t overbake.
You want the brownie fudgy, not cakey.
Cool completely.
PART 2 — THICK CARAMEL SAUCE
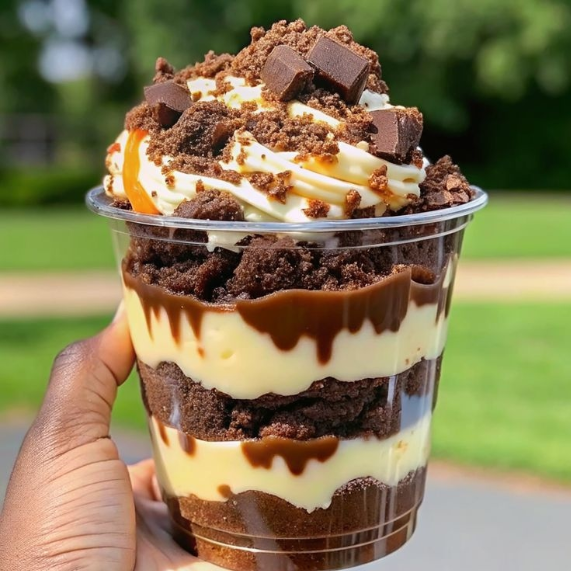
This is the caramel visible between the cream layers.
Ingredients
1 cup / 200 g granulated sugar
¼ cup / 60 ml water
½ cup / 120 ml heavy cream
4 tbsp / 56 g unsalted butter
½ tsp vanilla
¼ tsp salt
Optional
For salted caramel:
½ tsp flaky sea salt
Method
Step 1
Put sugar and water into a heavy saucepan.
Heat over medium heat.
Don’t stir constantly.
Swirl the pan occasionally.
Step 2
The sugar will go:
clear → pale yellow → golden → amber.
When it reaches a deep golden amber, remove from heat.
Don’t let it become very dark brown because it can become bitter.
Step 3
Very carefully add the warm cream.
It will bubble aggressively.
Do not put your face/hands over the pan.
Whisk carefully.
Step 4
Add butter.
Whisk until smooth.
Add vanilla and salt.
Step 5
Cool.
The caramel thickens substantially as it cools.
For the dessert cups, you want:
thick but squeezable.
If it’s too thick:
Add 1 tsp warm cream at a time.
If too thin:
Cool it longer.
PART 3 — VANILLA CARAMEL CUSTARD
This creates the pale cream-colored layer in the photograph.
Ingredients
3 cups / 720 ml whole milk
½ cup / 100 g granulated sugar
4 tbsp / 32 g cornstarch
3 egg yolks
2 tbsp / 28 g butter
1 tsp vanilla
¼ tsp salt
½ cup / 120 g prepared caramel sauce
Method
Step 1
In a bowl whisk:
egg yolks
sugar
cornstarch
Add approximately ½ cup of the milk.
Whisk until completely smooth.
Step 2
Heat remaining milk in a saucepan.
Heat until steaming but don’t allow it to boil aggressively.
Step 3
Slowly pour some hot milk into the egg mixture while whisking.
This tempers the eggs.
Step 4
Pour everything back into the saucepan.
Cook over medium-low heat while continuously whisking.
Within several minutes it should become thick.
Step 5
Once thick:
Remove from heat.
Add:
butter
vanilla
salt
Whisk.
Step 6
Add:
½ cup caramel sauce.
Whisk until completely incorporated.
Step 7
Strain
Pour the custard through a fine-mesh strainer.
This gives you a very smooth professional texture.
Cover the surface directly with plastic wrap.
Refrigerate until completely cold.
PART 4 — CHOCOLATE GANACHE
The dark chocolate streaks in the photograph can be made with this.
Ingredients
150 g / 5.3 oz semi-sweet or dark chocolate
150 ml / ⅔ cup heavy cream
1 tbsp butter
Pinch of salt
Method
Chop chocolate finely.
Heat cream until steaming.
Pour over chocolate.
Wait 1 minute.
Stir from the center outward.
Add butter.
Add salt.
Cool until thick enough to pipe.
You want a consistency similar to thick chocolate syrup.
🤍 PART 5 — STABILIZED WHIPPED CREAM
The photo has a generous mound of whipped cream on top.
Ingredients
2 cups / 480 ml cold heavy whipping cream
½ cup / 60 g powdered sugar
1 tsp vanilla
2 tbsp mascarpone OR cream cheese
Method
Beat cream until it begins to thicken.
Add powdered sugar.
Add vanilla.
Add mascarpone/cream cheese.
Continue beating until medium-stiff to stiff peaks.
Don’t overbeat.
PART 6 — CHOCOLATE CRUMBLE
This is what makes the top look like the photograph.
Take approximately:
1 brownie
and crumble it into irregular pieces.
Don’t make everything into fine crumbs.
You want:
fine crumbs
medium pieces
chunky pieces
all together.
PART 7 — CHOCOLATE CHUNKS
For the large pieces visible on top:
100 g dark chocolate
50 g milk chocolate
Chop irregularly.
Keep some pieces approximately ½–¾ inch.
You can also simply use chopped brownie pieces.
NUT OPTION
The pictured dessert does not clearly show nuts.
The brown pieces appear primarily to be brownie/chocolate rather than identifiable nuts.
For a nut-free version, don’t add nuts.
If you WANT a nut version, excellent choices are:
Almond
Use ¼ cup roasted chopped almonds.
Pecans
Use ¼ cup toasted chopped pecans.
Hazelnuts
Use ¼ cup toasted chopped hazelnuts.
Walnuts
Use ¼ cup toasted chopped walnuts.
Pistachios
Use ¼ cup chopped pistachios.
FULL ALLERGEN / NUT INFORMATION
The basic recipe contains:
Allergen Present?
Milk/dairy YES
Eggs YES
Wheat/gluten YES
Peanuts No intentional addition
Tree nuts No intentional addition
Soy Possibly, depending on chocolate
Sesame Possibly, depending on packaged ingredients
Coconut Possibly, depending on chocolate
Alcohol No intentional alcohol
Important
Chocolate and packaged brownie/cookie products can have peanut/tree-nut cross-contact.
So if you’re making this for someone with a serious allergy, check the actual labels of:
chocolate
cocoa
butter
cream
vanilla
sprinkles
decorations
packaged toppings
Don’t assume “no nuts in the recipe” means the finished product is allergen-free.
GLUTEN-FREE VERSION
Replace the all-purpose flour with a 1:1 gluten-free baking flour designed for brownies.
Use certified gluten-free cocoa/chocolate if necessary.
The custard, caramel, ganache and whipped cream can otherwise be naturally gluten-free, subject to ingredient labels.
🥛 DAIRY-FREE VERSION
Replace:
Butter → dairy-free butter
Heavy cream → dairy-free whipping cream
Whole milk → oat/soy/coconut milk
Chocolate → dairy-free chocolate
Mascarpone → dairy-free cream cheese
Note that coconut-based products introduce coconut, which may matter for certain allergy requirements.
NUT-FREE VERSION
For the safest nut-free design:
Don’t use almond flour.
Don’t use nut butter.
Don’t add nuts to the brownie.
Don’t add nut praline.
Don’t use hazelnut chocolate.
Check chocolate labels.
Check sprinkles/decorations.
Check packaged whipped toppings.
Use only verified nut-free ingredients where allergy safety is required.
PART 8 — ASSEMBLY
This is the most important part if you want the same visual appearance as the photograph.
Use clear:
8–10 oz / 240–300 ml plastic dessert cups.
Layer 1 — Brownie
Put approximately:
2–3 tbsp brownie crumbs
in the bottom.
Press gently.
Don’t compress it into a solid cake layer.
Layer 2 — Caramel
Drizzle:
1–2 tsp caramel
around the inside wall of the cup.
Let some caramel run down the sides.
This produces the decorative caramel streaks visible in the photograph.
Layer 3 — Vanilla caramel custard
Add approximately:
¼ cup / 60 g custard.
Smooth gently.
Layer 4 — Chocolate ganache
Pipe/drizzle:
1–2 tsp chocolate ganache
around the edge.
Let it drip slightly down the custard.
Layer 5 — Brownie chunks
Add:
¼ cup brownie chunks.
Don’t press too hard.
Layer 6 — Custard
Add another:
¼ cup vanilla-caramel custard.
Layer 7 — Caramel
Add another:
1–2 tsp caramel sauce.
Again, let it streak down the inside of the cup.
Layer 8 — Brownie crumble
Add:
2–3 tbsp brownie crumble.
☁️ PART 9 — TOP
Pipe a large spiral of stabilized whipped cream.
Start in the center and work outward/upward.
Make the top tall, because the photo has a substantial whipped-cream dome.
Then add:
Caramel
Drizzle lightly over the cream.
Chocolate
Drizzle chocolate ganache.
Brownie crumbs
Sprinkle generously.
Brownie chunks
Add 4–6 larger pieces.
Final caramel
Add a few thin caramel lines.
THE EXACT LOOK
For the photograph, don’t make perfectly horizontal layers.
The attractive appearance comes from irregular caramel drips.
Before filling the cup:
Put caramel in a squeeze bottle.
Make 5–7 thin vertical lines inside the cup.
Rotate the cup.
Add custard.
Repeat the caramel lines on the next layer.
Add brownie.
This gives the brown-and-cream waterfall effect seen in the image.
PROFESSIONAL PORTION FORMULA
For one approximately 9-oz cup:
Component Amount
Brownie 70–80 g
Vanilla-caramel custard 90–100 g
Caramel 20–25 g
Chocolate ganache 10–15 g
Whipped cream 50–60 g
Top brownie/chocolate 20–25 g
Total:
approximately 260–300 g per cu
CHILLING
After assembly:
Refrigerate 2–4 hours.
For best texture, make the components ahead and assemble several hours before serving.
Layered trifles generally benefit from chilling because the cake/brownie absorbs some of the cream and pudding, producing a softer, fudgier texture.
STORAGE
Keep refrigerated.
For best quality:
1–2 days
The brownie/custard portion can generally hold longer, but the whipped topping and crunchy garnish deteriorate faster.
If preparing commercially, add the final crunchy garnish as close to serving as practical.
COMPLETE Q&A
Q: Can I use boxed brownies?
Absolutely.
For a business or large batch, boxed brownies are actually a convenient option.
Bake slightly less than the package’s maximum recommended time so they remain fudgy.
Q: Can I use chocolate cake instead?
Yes.
Brownie = richer/fudgier
Chocolate cake = lighter/softer
The photograph looks closer to brownie/cake chunks than ordinary fluffy cake.
Q: Can I use chocolate pudding instead of vanilla caramel custard?
Yes.
But the pictured dessert has a pale vanilla/cream-colored layer, so vanilla caramel custard gives a closer appearance.
Traditional chocolate trifles commonly use chocolate pudding with cake/brownies and whipped cream.
Q: Why is my caramel too hard?
It was cooked too far or cooled too much.
Warm gently and whisk in:
1 tsp cream at a time.
Q: Why did my caramel become grainy?
Possible causes:
Sugar crystallization
Stirring too aggressively during caramelization
Undissolved sugar crystals on the pan sides
For smoother caramel, use a clean heavy saucepan and avoid stirring once the sugar begins boiling.
Q: Why is my custard lumpy?
Usually the cornstarch wasn’t fully dispersed or the custard was heated too aggressively.
Solution:
Strain it while hot.
That’s why I recommend the fine-mesh strainer.
Q: Can I use instant pudding?
Yes.
For a shortcut, prepare vanilla instant pudding and fold in some cooled caramel sauce.
However, homemade custard gives a more bakery-style flavor and texture.
Q: Can I make this without eggs?
Yes.
Replace the egg-yolk custard with a cornstarch custard:
3 cups milk
½ cup sugar
5 tbsp cornstarch
2 tbsp butter
vanilla
caramel
Whisk cold milk + cornstarch first, then cook until thick.
Q: Can I make it without an oven?
Yes.
Use purchased brownies or chocolate cake.
Then make only:
custard + caramel + ganache + whipped cream
This turns it into an almost no-bake dessert.
Q: How do I make the top like the photograph?
Use a large open-star piping tip and pipe the whipped cream high.
Then add:
caramel
chocolate sauce
brownie crumbs
large brownie chunks
chocolate chunks
Don’t sprinkle everything uniformly. The deliberately irregular topping creates the bakery look.
Q: Can I put caramel inside the custard?
Yes.
That’s what we’re doing here.
Adding caramel directly to the vanilla custard gives the pale layer a caramel flavor without making it dark.
Q: Can I use dulce de leche?
Yes — and it’s an excellent shortcut.
Thin it with a little warm cream until it becomes squeezeable.
For a stronger caramel flavor, you can replace the homemade caramel sauce with dulce de leche.
Q: Can I use store-bought caramel sauce?
Yes.
Choose a thick dessert caramel, not a very thin pancake syrup.
If necessary, simmer it briefly or chill it to make it thicker.
Q: Can I add nuts?
Yes.
My favorite combination for this dessert is:
pecans + caramel + chocolate + brownie.
Toast the pecans first, cool them completely, then chop.
But for a nut-free product, leave them out and verify packaged ingredients for cross-contact.
Q: Which nut tastes best?
For this particular dessert:
1. Pecans — best with caramel
2. Hazelnuts — best with dark chocolate
3. Almonds — mild and crunchy
4. Walnuts — stronger, slightly bitter
5. Pistachios — attractive but less traditional
Q: Can I sell these?
Yes, subject to your local food-business regulations.
Use food-safe lidded cups, refrigeration, ingredient/allergen labeling and an appropriate shelf-life procedure.
For commercial production, don’t use the generic allergen list above as your legal label; calculate it from the exact brands and ingredients you purchase.
MY BEST VERSION FOR THE PHOTO
If your goal is specifically to recreate this exact visual style, I’d use:
Fdgy brownie
Caramel streak
Vanilla-caramel custard
Chocolate ganache streak
Brownie chunks
Vanilla-caramel custard
Caramel streak
Brownie crumble
Tall whipped cream
Caramel + chocolate drizzle
Brownie crumbs + large brownie chunks + chocolate pieces

With years of experience in restaurant research and local SEO, Sara creates accurate, user-friendly guides that work for both people and search engines. Her goal is to help users go from search results to their nearest restaurant or menu choice with as few clicks as possible.
- Stuffed Cabbage Rolls - October 18, 2026
- Easy Crockpot Creamy Garlic Parmesan Chicken - October 18, 2026
- Turmeric Carrot Lentil Stew - October 18, 2026