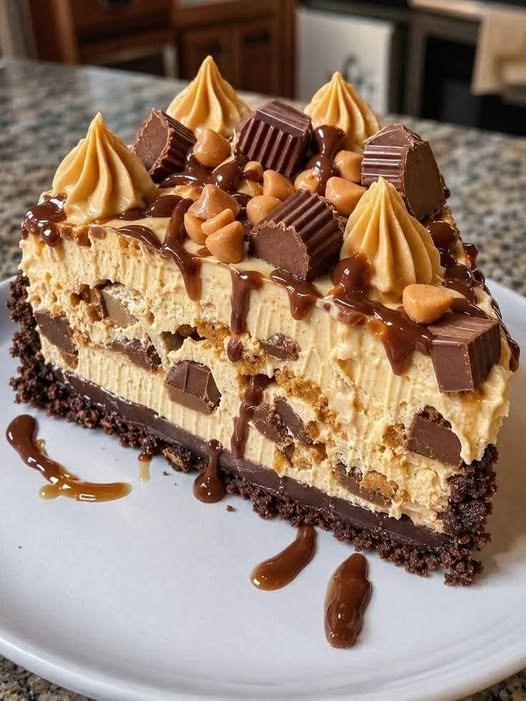
A rich, ultra-creamy cheesecake loaded with peanut butter, chocolate, and Reese’s Peanut Butter Cups, finished with silky chocolate ganache and extra Reese’s cups. This is an indulgent dessert inspired by classic Reese’s cheesecake combinations.
Recipe Details
Prep Time: 30 minutes
Bake Time: 1 hour 15 minutes
Chill Time: 6–8 hours
Total Time: About 8–10 hours
Servings: 10–12
Pan: 9-inch springform pan
Difficulty: Intermediate
Ingredients
Chocolate Cookie Crust
30 chocolate sandwich cookies, finely crushed
¼ cup unsalted butter, melted
Pinch of salt
Peanut Butter Cheesecake Filling
4 packages (8 oz each) full-fat cream cheese, softened
1½ cups packed light brown sugar
1 cup creamy peanut butter
½ cup heavy cream
5 large eggs, room temperature
1 teaspoon vanilla extract
12–15 Reese’s Peanut Butter Cups, roughly chopped
The combination of cream cheese, peanut butter, eggs, cream, and Reese’s cups is consistent with established Reese’s cheesecake recipes.
Chocolate Ganache
½ cup heavy cream
1 cup semi-sweet or bittersweet chocolate chips
1 tablespoon creamy peanut butter, optional
Topping
8–10 mini Reese’s Peanut Butter Cups, halved
¼ cup chopped Reese’s Peanut Butter Cups
2–3 tablespoons melted peanut butter
Whipped cream, optional
Instructions
1. Prepare the Pan
Preheat the oven to 325°F (165°C).
Grease a 9-inch springform pan.
Wrap the outside bottom and sides of the pan tightly with 2 layers of aluminum foil if you’re using a water bath.
2. Make the Chocolate Cookie Crust
Place the chocolate sandwich cookies in a food processor and pulse until finely crushed.
Add the melted butter and pinch of salt.
Pulse until the crumbs resemble wet sand.
Press the mixture firmly into the bottom of the springform pan and slightly up the sides.
Bake for 10–12 minutes.
Remove from the oven and allow the crust to cool completely. A chocolate cookie crust with melted butter is also used in established Reese’s cheesecake recipes.
3. Prepare the Peanut Butter Filling
Place the softened cream cheese in a large mixing bowl.
Beat on medium-low speed until completely smooth.
Add the brown sugar and mix until incorporated.
Add the peanut butter and beat until creamy.
Pour in the heavy cream and vanilla.
Mix gently.
4. Add the Eggs
Add the eggs one at a time, mixing on low speed just until each egg disappears into the batter.
Avoid overmixing.
Overmixing can incorporate too much air, which may contribute to cracks.
5. Add the Reese’s Cups
Roughly chop the Reese’s Peanut Butter Cups.
Fold them gently into the cheesecake batter using a rubber spatula.
Reserve a few pieces for decorating the finished cheesecake.
6. Fill the Pan
Pour the cheesecake batter over the cooled chocolate crust.
Smooth the top with a spatula.
Tap the pan gently on the counter a couple of times to release large air bubbles.
7. Prepare the Water Bath
Place the foil-wrapped springform pan inside a larger roasting pan.
Carefully pour about 1 inch of hot water into the roasting pan.
A water bath can help cheesecake bake more gently and reduce cracking.
8. Bake
Bake at 325°F (165°C) for approximately 1 hour 15 minutes.
The outside should look set while the center still has a slight jiggle.
Don’t wait for the center to become completely firm in the oven.
9. Cool Gradually
Turn the oven off.
Leave the cheesecake inside with the door closed for approximately 1 hour.
Then remove it from the oven and place it on a wire rack.
Run a thin knife carefully around the edge to loosen the cheesecake from the pan.
Allow it to cool completely.
10. Chill
Cover the cheesecake and refrigerate for at least 6 hours, preferably overnight.
This step is essential for achieving clean slices and a firm, creamy texture.
11. Make the Chocolate Ganache
Heat the heavy cream in a small saucepan over medium-low heat until very hot but not boiling.
Remove from the heat.
Add the chocolate chips.
Let stand for about 2–3 minutes.
Stir slowly until completely smooth.
For an extra peanut-butter flavor, stir in 1 tablespoon peanut butter.
Allow the ganache to cool slightly so it thickens.
12. Decorate the Cheesecake
Remove the sides of the springform pan.
Pour the ganache over the top of the chilled cheesecake.
Use a spatula to gently spread it toward the edges, allowing some chocolate to drip naturally down the sides.
Drizzle melted peanut butter over the ganache.
Arrange halved mini Reese’s Peanut Butter Cups around the top.
Add whipped cream if desired.
13. Slice & Serve
For clean slices, dip a sharp knife in hot water.
Wipe it dry.
Slice the cheesecake.
Clean and rewarm the knife between cuts.
Serve chilled.
Extra-Decadent Topping
For an over-the-top Reese’s cheesecake, add:
Chocolate ganache
Peanut butter drizzle
Mini Reese’s cups
Chopped Reese’s cups
Whipped cream
A little warm fudge sauce
This follows the general style of highly decorated Reese’s cheesecakes that use ganache/fudge and additional candy pieces for finishing.
COMPLETE NUT & ALLERGEN INFORMATION
This recipe CONTAINS PEANUTS.
The intentional peanut-containing ingredients are:
Peanut butter
Reese’s Peanut Butter Cups
Peanut butter drizzle
Peanuts are legumes, not tree nuts, but they are a major food allergen.
It may also contain:
Milk: cream cheese, butter, heavy cream, chocolate, Reese’s cups
Eggs: cheesecake filling
Soy: potentially present in chocolate and packaged candy
Wheat/gluten: chocolate sandwich cookies
Always check the actual product labels because formulations and allergen statements can vary.
Tree Nuts
The recipe does not intentionally contain tree nuts such as:
Almonds
Walnuts
Pecans
Cashews
Pistachios
Hazelnuts
However, packaged chocolate, cookies, peanut butter, and candy may carry tree-nut cross-contact warnings.
Important Allergy Note
This is not an appropriate recipe for someone with a peanut allergy because peanut butter and Reese’s Peanut Butter Cups are essential ingredients.
For someone with a severe food allergy, use their specific allergen-management guidance and carefully check every packaged ingredient.
Gluten Information
The standard chocolate sandwich-cookie crust contains wheat/gluten.
To make a gluten-free version:
Use certified gluten-free chocolate sandwich cookies.
Verify all chocolate and candy ingredients.
Check peanut butter and other packaged ingredients for cross-contact.
Storage
Store the cheesecake covered in the refrigerator.
Refrigerator
Best enjoyed within 4–5 days.
Freezer
Freeze individual slices or the whole unfrosted cheesecake for up to 2 months for best quality.
Wrap tightly in plastic wrap and then foil.
Thaw overnight in the refrigerator.
Q&A
Q: Why did my cheesecake crack?
Overmixing, sudden temperature changes, or overbaking can contribute to cracking. Mix gently after adding eggs and cool the cheesecake gradually.
Q: Does the center need to be completely firm when I remove it?
No. The center should have a slight jiggle when the cheesecake is finished baking. It will firm considerably as it cools and chills.
Q: Do I have to use a water bath?
No, but it can help the cheesecake bake more gently and reduce cracking.
Q: Can I use natural peanut butter?
You can, but natural peanut butter can be more oily or separated. A well-stirred creamy peanut butter generally gives a more consistent cheesecake texture.
Q: Can I use crunchy peanut butter?
Yes, although creamy peanut butter gives the smoothest filling.
Q: Can I use a premade crust?
Absolutely. A prepared chocolate cookie crust can save time.
Q: Can I use a graham cracker crust?
Yes. It will taste less chocolatey but still pairs beautifully with peanut butter.
Q: Can I make this without Reese’s cups inside the cheesecake?
Yes. Simply omit the chopped candy from the filling and use it only as a topping.
Q: Can I make this cheesecake ahead of time?
Yes! Cheesecake is actually excellent for making ahead. Prepare it the day before and refrigerate overnight.
Q: How do I get clean slices?
Use a sharp knife warmed in hot water, wipe it dry, slice, and repeat between cuts.
Q: Can I freeze Reese’s cheesecake?
Yes. Freeze it without whipped cream for the best texture. Thaw overnight in the refrigerator.
Q: Why is my cheesecake too soft?
It may need more chilling time. Cheesecake becomes significantly firmer after several hours in the refrigerator.
Q: Can I use milk chocolate instead of semi-sweet chocolate?
Yes. Milk chocolate makes the ganache sweeter, while semi-sweet or bittersweet chocolate balances the rich peanut butter filling better.
Q: Can I make mini Reese’s cheesecakes?
Yes. Divide the crust and filling among lined muffin cups and reduce the baking time considerably. Mini versions are also made commercially using Reese’s peanut butter components and chocolate ganache.
Approximate Nutrition
This is an indulgent dessert, so the nutrition is naturally high.
Per slice, assuming 12 servings and including ganache/toppings:
Calories: ~800–950
Protein: ~15–18g
Carbohydrates: ~75–90g
Fat: ~50–60g
Saturated Fat: ~25–30g
Sugar: ~55–65g
Nutrition is an estimate and varies substantially depending on the brands, amount of Reese’s cups, crust, ganache, and serving size.
For comparison, Hershey land’s official Reese’s Peanut Butter Cheesecake lists 1,080 calories per 265 g slice when divided into 12 servings, illustrating how rich this style of cheesecake can be.
Pro Tips
Bring cream cheese and eggs to room temperature.
Don’t whip the batter excessively.
Use full-fat cream cheese for the richest texture.
Don’t overbake—the center should still jiggle slightly.
Cool gradually.
Chill overnight whenever possible.
Add candy toppings after the cheesecake is completely chilled.
For the cleanest presentation, add ganache shortly before serving.

With years of experience in restaurant research and local SEO, Sara creates accurate, user-friendly guides that work for both people and search engines. Her goal is to help users go from search results to their nearest restaurant or menu choice with as few clicks as possible.
- Grandma’s Cream Puffs – Light, Crisp & Creamy - October 17, 2026
- Easy Crockpot Creamy Garlic Parmesan Chicken - October 17, 2026
- Garlic Herb Roasted Potatoes - October 17, 2026